


E.Nourddine
-
المساهمات
1458 -
تاريخ الانضمام
-
تاريخ آخر زيارة
-
عدد الأيام التي تصدر بها
18
نوع المحتوى
ريادة الأعمال
البرمجة
التصميم
DevOps
التسويق والمبيعات
العمل الحر
البرامج والتطبيقات
آخر التحديثات
قصص نجاح
أسئلة وأجوبة
كتب
دورات
أجوبة بواسطة E.Nourddine
-
-
عموما الأزرار هي الأزرار، سواء على wordpress، blogger أو على صفحة Html عادية، لا اختلاف يُذكر في طريقة التكويد.
هاكَ هذه القائمة التي ألجأ إليها بين الفينة والأخرى:
- http://dabuttonfactory.com/
- http://www.cssportal.com/css3-button-generator/
- http://www.bestcssbuttongenerator.com/
- http://www.bestcssbuttongenerator.com/
بالاضافة إلى بعض الدرروس المهمة في هذا الشأن :
-
يمكن إضافة بعض الخصائص لعنصر Circle بداخل ملف Xml ، حيث تعمل هذه الخصائص على التحكم في لون، سمك الإطار المحيط بالدائرة، مثلا:
في ملف res/values/attrs.xml:
<?xml version="1.0" encoding="utf-8"?>
<resources>

    <declare-styleable name="CircleView">
        <attr name="strokeWidth" format="dimension"/>
        <attr name="strokeColor" format="color|reference"/>
        <attr name="fillColor" format="color|reference"/>
        <attr name="circleRadius" format="dimension"/>
        <attr name="circleGap" format="dimension"/>
    </declare-styleable>

</resources>
ملف CircleView.Java وهو ملف كلاس المسؤول عن رسم الدائرة:
package ms.cloudtea.customcircleview.app.ui;

import android.content.Context;
import android.content.res.TypedArray;
import android.graphics.Canvas;
import android.graphics.Paint;
import android.util.AttributeSet;

import ms.cloudtea.customcircleview.app.R;

/**
 * Created by Shahab on 3/20/14.
 */
public class CircleView
extends AbstractBaseView
{

    private int circleRadius = 20;
    private int strokeColor = 0xFFFF8C00;
    private int strokeWidth = 15;
    private int fillColor = 0XFFFFAB00;
    private int circleGap = 20;

    public CircleView(Context context) {
        super(context);

        init();
    }

    public CircleView(Context context, AttributeSet attrs) {
        this(context, attrs, 0);

        init();
    }

    public CircleView(Context context, AttributeSet attrs, int defStyleAttr) {
        super(context, attrs, defStyleAttr);

        TypedArray aTypedArray = context.obtainStyledAttributes(attrs, R.styleable.CircleView, defStyleAttr, 0);

        strokeColor = aTypedArray.getColor(R.styleable.CircleView_strokeColor, strokeColor);
        strokeWidth = aTypedArray.getDimensionPixelSize(R.styleable.CircleView_strokeWidth, strokeWidth);
        fillColor = aTypedArray.getColor(R.styleable.CircleView_fillColor, fillColor);
        circleRadius = aTypedArray.getDimensionPixelSize(R.styleable.CircleView_circleRadius, circleRadius);
        circleGap = aTypedArray.getDimensionPixelSize(R.styleable.CircleView_circleGap, circleGap);

        aTypedArray.recycle();

        init();
    }

    public CircleView(Context context, int strokeColor, int strokeWidth, int fillColor, int circleRadius, int circleGap) {
        super(context);
        this.strokeColor = strokeColor;
        this.strokeWidth = strokeWidth;
        this.fillColor = fillColor;
        this.circleRadius = circleRadius;
        this.circleGap = circleGap;

        init();
    }

    private void init() {
        this.setMinimumHeight(circleRadius * 2 + strokeWidth);
        this.setMinimumWidth(circleRadius * 2 + strokeWidth);
        this.setSaveEnabled(true);
    }

    @Override
    public void onDraw(Canvas canvas) {
        super.onDraw(canvas);

        int w = this.getWidth();
        int h = this.getHeight();

        int ox = w/2;
        int oy = h/2;

        canvas.drawCircle(ox, oy, circleRadius, getStroke());
        canvas.drawCircle(ox, oy, circleRadius - circleGap, getFill());
    }

    private Paint getStroke()
    {
        Paint p = new Paint(Paint.ANTI_ALIAS_FLAG);
        p.setStrokeWidth(strokeWidth);
        p.setColor(strokeColor);
        p.setStyle(Paint.Style.STROKE);
        return p;
    }

    private Paint getFill()
    {
        Paint p = new Paint(Paint.ANTI_ALIAS_FLAG);
        p.setColor(fillColor);
        p.setStyle(Paint.Style.FILL);
        return p;
    }

    @Override
    protected int hGetMaximumHeight() {
        return circleRadius * 2 + strokeWidth;
    }

    @Override
    protected int hGetMaximumWidth() {
        return circleRadius * 2 + strokeWidth;
    }

    public int getCircleRadius() {
        return circleRadius;
    }

    public void setCircleRadius(int circleRadius) {
        this.circleRadius = circleRadius;
    }

    public int getStrokeColor() {
        return strokeColor;
    }

    public void setStrokeColor(int strokeColor) {
        this.strokeColor = strokeColor;
    }

    public int getStrokeWidth() {
        return strokeWidth;
    }

    public void setStrokeWidth(int strokeWidth) {
        this.strokeWidth = strokeWidth;
    }

    public int getFillColor() {
        return fillColor;
    }

    public void setFillColor(int fillColor) {
        this.fillColor = fillColor;
    }

    public int getCircleGap() {
        return circleGap;
    }

    public void setCircleGap(int circleGap) {
        this.circleGap = circleGap;
    }
}
ثم ملف layout/activty_main.xml:
<ms.cloudtea.customcircleview.app.ui.CircleView
        android:id="@+id/circle_view"
        android:layout_width="wrap_content"
        android:layout_height="wrap_content"
        android:layout_centerInParent="true"
        cloudteams:circleRadius="@dimen/circle_view_radius"
        cloudteams:strokeWidth="@dimen/circle_view_stroke"
        cloudteams:circleGap="@dimen/circle_view_gap"
        cloudteams:fillColor="@android:color/holo_orange_light"
        cloudteams:strokeColor="@android:color/holo_purple"/>
-
سأحاول إرفاق كود يجيب عن كل سؤال من السؤالين، ولنبدأ بالتأكد من اتصال الجهاز -الهاتف- بالأنترنت، وذلك عن طريق اظافة الوظيفة التي ستعيد لنا القيمةtrue في حال كان الجهاز متصلاً :
public boolean isInternetAvailable() {
        try {
            InetAddress ipAddr = InetAddress.getByName("google.com"); //You can replace it with your name

            if (ipAddr.equals("")) {
                return false;
            } else {
                return true;
            }

        } catch (Exception e) {
            return false;
        }

    }
في ملف manifest:
<uses-permission android:name="android.permission.ACCESS_WIFI_STATE" />
    <uses-permission android:name="android.permission.ACCESS_NETWORK_STATE" />
ولإبطل عمل خاصية إدارة الشاشة عند عمل التطبيق، يكفي أن تضيف
android:screenOrientation="portrait"إلى كودActivity لتصبح بالشكل:
<activity
            ...
            ...
            android:screenOrientation="portrait">
-
في أغلب الأحيان يكون هذا المشكل ناتج عن عدم تثبثك لمحاك معين، كما يتضح من خلال الصورة التالية:
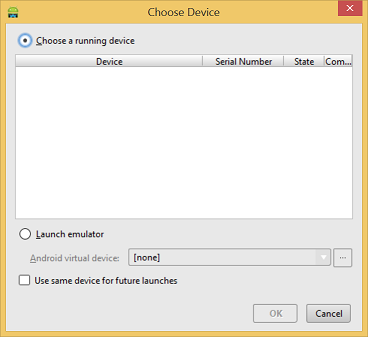
وفي هذه الحالة يكفي أن تقوم بفعل ذلك، أي أن تثبث drivers الخاصة بالمحاكي المراد تشغيل التطبيق عليه، من خلال الرابط.
كما أن المشكل قد يكون نابعا من عدم قدرة الحاسوب على تحمل الميموري المخصصة لهذا المحاكي، وقد تحصل على هذه الرسالة:
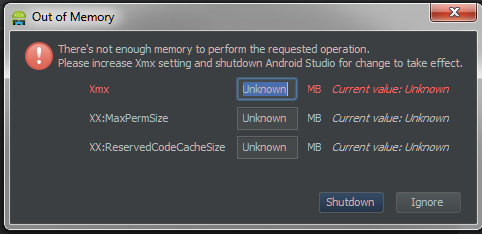
في هذه الحالة تذهب إلى الملف
android-studio\binوتغير القيم -Xmx و -Xms داخل ملف studio.exe.vmoptions أو studio64.exe.vmoptions (حسب نواة نظام التشغيل المثبث) -
كنت قد استفدت من هذا الكود، والذي يتوفر على 2 كلاسات.
الأولة من أجل جلب Id الخاص بـ Paypal وبالتالي استعماله في التطبيق:
public class ResultDelegate implements PayPalResultDelegate, Serializable {
     private static final long serialVersionUID = 10001L;


    public void onPaymentSucceeded(String payKey, String paymentStatus) {

        main.resultTitle = "SUCCESS";
        main.resultInfo = "You have successfully completed your transaction.";
        main.resultExtra = "Key: " + payKey;
    }


    public void onPaymentFailed(String paymentStatus, String correlationID,
                  String payKey, String errorID, String errorMessage) {
        main.resultTitle = "FAILURE";
        main.resultInfo = errorMessage;
        main.resultExtra = "Error ID: " + errorID + "\nCorrelation ID: "
           + correlationID + "\nPay Key: " + payKey;
    }


    public void onPaymentCanceled(String paymentStatus) {
        main.resultTitle = "CANCELED";
        main.resultInfo = "The transaction has been cancelled.";
        main.resultExtra = "";
    }
ملف Main class:
public class main extends Activity implements OnClickListener {

// The PayPal server to be used - can also be ENV_NONE and ENV_LIVE
private static final int server = PayPal.ENV_LIVE;
// The ID of your application that you received from PayPal
private static final String appID = "APP-0N8000046V443613X";
// This is passed in for the startActivityForResult() android function, the value used is up to you
private static final int request = 1;

public static final String build = "10.12.09.8053";

protected static final int INITIALIZE_SUCCESS = 0;
protected static final int INITIALIZE_FAILURE = 1;

TextView labelSimplePayment;
LinearLayout layoutSimplePayment;
CheckoutButton launchSimplePayment;
Button exitApp;
TextView title;
TextView info;
TextView extra;
TextView labelKey;
TextView appVersion;
EditText enterPreapprovalKey;

public static String resultTitle;
public static String resultInfo;
public static String resultExtra;
private String isuename;
private String isueprice;

Handler hRefresh = new Handler(){
    @Override
    public void handleMessage(Message msg) {
        switch(msg.what){

        case INITIALIZE_SUCCESS:
            setupButtons();
            break;
        case INITIALIZE_FAILURE:
            showFailure();
            break;
        }
    }
};


@Override
public void onCreate(Bundle savedInstanceState) {
    super.onCreate(savedInstanceState);
    requestWindowFeature(Window.FEATURE_NO_TITLE);
    Thread libraryInitializationThread = new Thread() {
        @Override
        public void run() {
            initLibrary();

            // The library is initialized so let's create our CheckoutButton and update the UI.
            if (PayPal.getInstance().isLibraryInitialized()) {
                hRefresh.sendEmptyMessage(INITIALIZE_SUCCESS);
            }
            else {
                hRefresh.sendEmptyMessage(INITIALIZE_FAILURE);
            }
        }
    };
    libraryInitializationThread.start();


     isuename=getIntent().getStringExtra("name").trim();
     isueprice=getIntent().getStringExtra("price").replace("$", "").trim();

     Log.v("isuename ",""+isuename);
     Log.v("isueprice ",""+isueprice);

    LinearLayout content = new LinearLayout(this);
    content.setLayoutParams(new LayoutParams(android.view.ViewGroup.LayoutParams.FILL_PARENT, android.view.ViewGroup.LayoutParams.FILL_PARENT));
    content.setGravity(Gravity.CENTER_HORIZONTAL);
    content.setOrientation(LinearLayout.VERTICAL);
    content.setPadding(10, 10, 10, 10);
    content.setBackgroundColor(Color.WHITE);

    layoutSimplePayment = new LinearLayout(this);
    layoutSimplePayment.setLayoutParams(new LayoutParams(android.view.ViewGroup.LayoutParams.WRAP_CONTENT, android.view.ViewGroup.LayoutParams.WRAP_CONTENT));
    layoutSimplePayment.setGravity(Gravity.CENTER_HORIZONTAL);
    layoutSimplePayment.setOrientation(LinearLayout.VERTICAL);
    layoutSimplePayment.setPadding(0, 5, 0, 5);

    labelSimplePayment = new TextView(this);
    labelSimplePayment.setGravity(Gravity.CENTER_HORIZONTAL);
    labelSimplePayment.setText("C&EN");
    labelSimplePayment.setTextColor(Color.RED);
    labelSimplePayment.setTextSize(45.0f);

    layoutSimplePayment.addView(labelSimplePayment);
          //        labelSimplePayment.setVisibility(View.GONE);

    content.addView(layoutSimplePayment);

    LinearLayout layoutKey = new LinearLayout(this);
    layoutKey.setLayoutParams(new LayoutParams(android.view.ViewGroup.LayoutParams.WRAP_CONTENT, android.view.ViewGroup.LayoutParams.WRAP_CONTENT));
    layoutKey.setGravity(Gravity.CENTER_HORIZONTAL);
    layoutKey.setOrientation(LinearLayout.VERTICAL);
    layoutKey.setPadding(0, 1, 0, 5);

    enterPreapprovalKey = new EditText(this);
    enterPreapprovalKey.setLayoutParams(new LayoutParams(200, 45));
    enterPreapprovalKey.setGravity(Gravity.CENTER);
    enterPreapprovalKey.setSingleLine(true);
    enterPreapprovalKey.setHint("Enter PA Key");
    layoutKey.addView(enterPreapprovalKey);
    enterPreapprovalKey.setVisibility(View.GONE);
    labelKey = new TextView(this);
    labelKey.setGravity(Gravity.CENTER_HORIZONTAL);
    labelKey.setPadding(0, -5, 0, 0);
    labelKey.setText("(Required for Preapproval)");
    layoutKey.addView(labelKey);
    labelKey.setVisibility(View.GONE);
    content.addView(layoutKey);

    title = new TextView(this);
    title.setLayoutParams(new LinearLayout.LayoutParams(android.view.ViewGroup.LayoutParams.FILL_PARENT, android.view.ViewGroup.LayoutParams.WRAP_CONTENT));
    title.setPadding(0, 5, 0, 5);
    title.setGravity(Gravity.CENTER_HORIZONTAL);
    title.setTextSize(30.0f);
    title.setVisibility(View.GONE);
    content.addView(title);

    info = new TextView(this);
    info.setLayoutParams(new LinearLayout.LayoutParams(android.view.ViewGroup.LayoutParams.FILL_PARENT, android.view.ViewGroup.LayoutParams.WRAP_CONTENT));
    info.setPadding(0, 5, 0, 5);
    info.setGravity(Gravity.CENTER_HORIZONTAL);
    info.setTextSize(20.0f);
    info.setVisibility(View.VISIBLE);
    info.setText("Please Wait! Initializing Paypal...");
    info.setTextColor(Color.BLACK);
    content.addView(info);

    extra = new TextView(this);
    extra.setLayoutParams(new LinearLayout.LayoutParams(android.view.ViewGroup.LayoutParams.FILL_PARENT, android.view.ViewGroup.LayoutParams.WRAP_CONTENT));
    extra.setPadding(0, 5, 0, 5);
    extra.setGravity(Gravity.CENTER_HORIZONTAL);
    extra.setTextSize(12.0f);
    extra.setVisibility(View.GONE);
    content.addView(extra);

    LinearLayout layoutExit = new LinearLayout(this);
    layoutExit.setLayoutParams(new LayoutParams(android.view.ViewGroup.LayoutParams.WRAP_CONTENT, android.view.ViewGroup.LayoutParams.WRAP_CONTENT));
    layoutExit.setGravity(Gravity.CENTER_HORIZONTAL);
    layoutExit.setOrientation(LinearLayout.VERTICAL);
    layoutExit.setPadding(0, 15, 0, 5);

    exitApp = new Button(this);
    exitApp.setLayoutParams(new LayoutParams(200, android.view.ViewGroup.LayoutParams.WRAP_CONTENT)); //Semi mimic PP button sizes
    exitApp.setOnClickListener(this);
    exitApp.setText("Exit");
    layoutExit.addView(exitApp);
    content.addView(layoutExit);

    appVersion = new TextView(this);
    appVersion.setGravity(Gravity.CENTER_HORIZONTAL);
    appVersion.setPadding(0, -5, 0, 0);
    appVersion.setText("\n\nSimple Demo Build " + build + "\nMPL Library Build " + PayPal.getBuild());
    content.addView(appVersion);
    appVersion.setVisibility(View.GONE);

    setContentView(content);
}
public void setupButtons() {
    PayPal pp = PayPal.getInstance();
    // Get the CheckoutButton. There are five different sizes. The text on the button can either be of type TEXT_PAY or TEXT_DONATE.
    launchSimplePayment = pp.getCheckoutButton(this, PayPal.BUTTON_194x37, CheckoutButton.TEXT_PAY);
    // You'll need to have an OnClickListener for the CheckoutButton. For this application, MPL_Example implements OnClickListener and we
    // have the onClick() method below.
    launchSimplePayment.setOnClickListener(this);
    // The CheckoutButton is an android LinearLayout so we can add it to our display like any other View.
    layoutSimplePayment.addView(launchSimplePayment);

    // Get the CheckoutButton. There are five different sizes. The text on the button can either be of type TEXT_PAY or TEXT_DONATE.

    // Show our labels and the preapproval EditText.
    labelSimplePayment.setVisibility(View.VISIBLE);


    info.setText("");
    info.setVisibility(View.GONE);
}
public void showFailure() {
    title.setText("FAILURE");
    info.setText("Could not initialize the PayPal library.");
    title.setVisibility(View.VISIBLE);
    info.setVisibility(View.VISIBLE);
}
private void initLibrary() {
    PayPal pp = PayPal.getInstance();

    if(pp == null) {

        pp = PayPal.initWithAppID(this, appID, server);
        pp.setLanguage("en_US"); // Sets the language for the library.
        pp.setFeesPayer(PayPal.FEEPAYER_EACHRECEIVER);
        // Set to true if the transaction will require shipping.
        pp.setShippingEnabled(true);
        // Dynamic Amount Calculation allows you to set tax and shipping amounts based on the user's shipping address. Shipping must be
        // enabled for Dynamic Amount Calculation. This also requires you to create a class that implements PaymentAdjuster and Serializable.
        pp.setDynamicAmountCalculationEnabled(false);
        // --
    }
}

private PayPalPayment exampleSimplePayment() {
    // Create a basic PayPalPayment.
    PayPalPayment payment = new PayPalPayment();
    // Sets the currency type for this payment.
    payment.setCurrencyType("USD");
    // Sets the recipient for the payment. This can also be a phone number.
    payment.setRecipient("harshd_1312435282_per@gmail.com");


    // Sets the amount of the payment, not including tax and shipping amounts.

    payment.setSubtotal(new BigDecimal(isueprice));
    // Sets the payment type. This can be PAYMENT_TYPE_GOODS, PAYMENT_TYPE_SERVICE, PAYMENT_TYPE_PERSONAL, or PAYMENT_TYPE_NONE.
    payment.setPaymentType(PayPal.PAYMENT_TYPE_GOODS);

    // PayPalInvoiceData can contain tax and shipping amounts. It also contains an ArrayList of PayPalInvoiceItem which can
    // be filled out. These are not required for any transaction.
    PayPalInvoiceData invoice = new PayPalInvoiceData();
    // Sets the tax amount.
    invoice.setTax(new BigDecimal("0"));
    // Sets the shipping amount.
    invoice.setShipping(new BigDecimal("0"));

    // PayPalInvoiceItem has several parameters available to it. None of these parameters is required.
    PayPalInvoiceItem item1 = new PayPalInvoiceItem();
    // Sets the name of the item.
    item1.setName(isuename);
    // Sets the ID. This is any ID that you would like to have associated with the item.
    item1.setID("87239");
    // Sets the total price which should be (quantity * unit price). The total prices of all PayPalInvoiceItem should add up
    // to less than or equal the subtotal of the payment.
    /*  item1.setTotalPrice(new BigDecimal("2.99"));
    // Sets the unit price.
    item1.setUnitPrice(new BigDecimal("2.00"));
    // Sets the quantity.
    item1.setQuantity(3);*/
    // Add the PayPalInvoiceItem to the PayPalInvoiceData. Alternatively, you can create an ArrayList<PayPalInvoiceItem>
    // and pass it to the PayPalInvoiceData function setInvoiceItems().
    invoice.getInvoiceItems().add(item1);

    // Create and add another PayPalInvoiceItem to add to the PayPalInvoiceData.
    /*PayPalInvoiceItem item2 = new PayPalInvoiceItem();
    item2.setName("Well Wishes");
    item2.setID("56691");
    item2.setTotalPrice(new BigDecimal("2.25"));
    item2.setUnitPrice(new BigDecimal("0.25"));
    item2.setQuantity(9);
    invoice.getInvoiceItems().add(item2);*/

    // Sets the PayPalPayment invoice data.
    payment.setInvoiceData(invoice);
    // Sets the merchant name. This is the name of your Application or Company.
    payment.setMerchantName("C&EN");
    // Sets the description of the payment.
    payment.setDescription("simple payment");
    // Sets the Custom ID. This is any ID that you would like to have associated with the payment.
    payment.setCustomID("8873482296");
    // Sets the Instant Payment Notification url. This url will be hit by the PayPal server upon completion of the payment.
    //payment.setIpnUrl("http://www.exampleapp.com/ipn");
    // Sets the memo. This memo will be part of the notification sent by PayPal to the necessary parties.
    payment.setMemo("Hi! I'm making a memo for a payment.");

    return payment;
}
@Override
public void onClick(View v) {

    if(v == launchSimplePayment) {
        // Use our helper function to create the simple payment.
        PayPalPayment payment = exampleSimplePayment();
        // Use checkout to create our Intent.
        Intent checkoutIntent = PayPal.getInstance().checkout(payment, this, new ResultDelegate());
        // Use the android's startActivityForResult() and pass in our Intent. This will start the library.
        startActivityForResult(checkoutIntent, request);
    } else if(v == exitApp) {

        Intent in = new Intent();
        in.putExtra("payment", "unpaid");
        /*in.putExtra("condition", "false");*/
        setResult(1,in);//Here I am Setting the Requestcode 1, you can put according to your requirement
        finish();
    }
}
@Override
public void onActivityResult(int requestCode, int resultCode, Intent data) {
    if(requestCode != request)
        return;

    if(main.resultTitle=="SUCCESS"){
        Intent in = new Intent();
        in.putExtra("payment", "paid");
        setResult(22,in);

    }else if(main.resultTitle=="FAILURE"){
        Intent in = new Intent();
        in.putExtra("payment", "unpaid");
        setResult(22,in);
                 //         finish();
    }else if(main.resultTitle=="CANCELED"){
        Intent in = new Intent();
        in.putExtra("payment", "unpaid");
        setResult(22,in);
                  //            finish();
    }


    launchSimplePayment.updateButton();

    title.setText(resultTitle);
    title.setVisibility(View.VISIBLE);
    info.setText(resultInfo);
    info.setVisibility(View.VISIBLE);
    extra.setText(resultExtra);
    extra.setVisibility(View.VISIBLE);
    finish();
}
@Override
public boolean onKeyDown(int keyCode, KeyEvent event) {
    if (keyCode == KeyEvent.KEYCODE_BACK) {
        Intent in = new Intent();
        in.putExtra("payment", "unpaid");
        setResult(1,in);
        finish();
        return true;
    }
    return super.onKeyDown(keyCode, event);
}
يمكنك أيضا الاستعانة بهذاالمشروع والذي هو عبارة عن مشروعSDKتضيفه إلى مشروعك، فقط اتبع المعلومات المُرفقة في المشروع.
-
 1
1
-
-
للتحكم في موضع الزر "Button" في تطبيق اندرويد، ما عليك إلا تفقد ملف xml الخاص بـ Layout المتعلق بمظهر التطبيق.
مثلا في هذا المثال:
<?xml version="1.0" encoding="utf-8"?>
<RelativeLayout xmlns:android="http://schemas.android.com/apk/res/android"
    android:layout_width="fill_parent"
    android:layout_height="fill_parent"
    >

    <Button
    android:layout_centerInParent="true"
    android:text="Button" android:id="@+id/button1" android:layout_width="wrap_content" android:layout_height="wrap_content"></Button>
</RelativeLayout>
حيث ستلاحظ وجود المقطع :
android:layout_centerInParent="true"مما سيجعل الزر يأتي وسط RelativeLayout المُتضمنة لها.
أيضا لجعل الزر أقل من الوسط بقليل، بالطريقة التالية:
<?xml version="1.0" encoding="utf-8"?>
<RelativeLayout xmlns:android="http://schemas.android.com/apk/res/android"
    android:layout_width="fill_parent"
    android:layout_height="fill_parent"
    >


    <TextView  android:layout_centerInParent="true" android:layout_width="wrap_content" android:id="@+id/textView1"
     android:layout_height="wrap_content" android:text=" " ></TextView>
    <Button
     android:layout_marginTop="5dip"
     android:layout_centerHorizontal="true"
    android:text="Button" android:layout_below="@id/textView1" android:id="@+id/button1" android:layout_width="wrap_content" android:layout_height="wrap_content"></Button>

</RelativeLayout>
يمكنك تغيير الكود :
android:layout_marginTop="5dip"للحصول على الشكل المُراد الحصول عليه، فقط غيّر في القيمة للحصول على ذلك.
-
-
1
-
-
هل بإمكانك التأكد من الخاصية visible لكل عنصر، لأنها هي المتحكمة في إظهار أو إخفاء العنصر؟ والتأكد من القيمة true لهذه الخاصية. - الخاصية ستجدها في مربع الخصائص في الجهة اليمنى أسفل البرنامج-
هل يمكنني الإطلاع على الكود المصدري للتطبيق؟
-
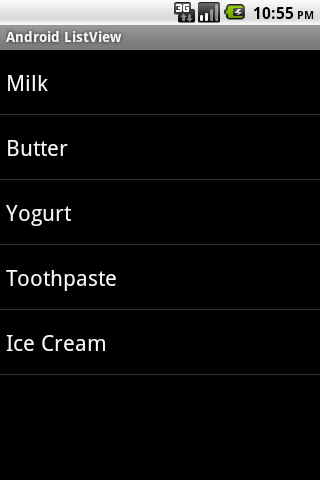
أقدم لك مثالا بسيطا يوضح لك كيفية استعمال قيم مصفوفة array string داخل أداةListView:
ملف main.xml، حيث نعرف العنصر ListView:
<?xml version="1.0" encoding="utf-8"?>
<LinearLayout xmlns:android="http://schemas.android.com/apk/res/android"
   android:orientation="vertical"
   android:layout_width="fill_parent"
   android:layout_height="fill_parent">

   <ListView
      android:id="@+id/listView1"
      android:layout_height="fill_parent"
      android:layout_width="fill_parent" />

</LinearLayout>
في ملف Mainactivity.java سنقوم بعمل دالة تقرأ المصفوفة عنصرا بعنصر ليتم إضافة جميع العناصر إلى لائحةListView، بهذا الشكل:
public class MainActivity extends Activity {

    @Override
    public void onCreate(Bundle savedInstanceState) {
        super.onCreate(savedInstanceState);
        setContentView(R.layout.main);

        ListView listView1 = (ListView) findViewById(R.id.listView1);

        String[] items = { "Milk", "Butter", "Yogurt", "Toothpaste", "Ice Cream" };

        ArrayAdapter<String> adapter = new ArrayAdapter<String>(this,
                    android.R.layout.simple_list_item_1, items);

        listView1.setAdapter(adapter);
    }
}
لنحصل على ListView:
-
إليك بعض الخطوات التي تساعد في تسريع برنامج photoshop cc:
- استعمل البرنامج على 64بيت: لأنه كما تعلم تسمح أنظمة التشغيل ذات نواة 64بيت باستعمال سعة ram بشكل كلي، عكس 32 بيت التي تُنقص من قدرة الميموري رام.
- استعمل جهاز لوحي للرسم: عوض استعمالك لجهاز الحاسوب في عملية الرسم، يفضل اقتناء جهاز لوحي tablet من أجل هذا الغرض.
- أنشئ اختصارات لوحة المفاتيح الخاصة بك: يتيح لك البرنامج امكانية إنشاء اختصارات لمختلف الأدوات على البرنامج، وذلك بغرض التسرع و عدم تضييع الوقت أثناء العمل.
- هناك طرق أخرى يمكنك الاطلاع عليها من خلال الرابط.
-
إليك هذا المثال الذي سبق لي التعامل معه، وأتمنى أن يكون مفيداً لك كما هو بالنسبة لي:
في ملف js الخاص بحدث تغيير ترتيب العناصر، أضف حدث الدالة التالي:
$("#list").live('hover', function() {
        $("#list").sortable({

            update : function () {

                var neworder = new Array();

                $('#list li').each(function() {

                    //get the id
                    var id  = $(this).attr("id");
                    //create an object
                    var obj = {};
                    //insert the id into the object
                    obj[] = id;
                    //push the object into the array
                    neworder.push(obj);

                });

                $.post("pagewhereyouuselist.php",{'neworder': neworder},function(data){});

            }
        });
    });
ليتم عند أي تغيير في ترتيب العناصل استدعاء ملف Php التالي المسؤول عن تخزين ترتيب العنصر داخل قاعدة البيانات:
$neworderarray = $_POST['neworder'];
//loop through the list of ids and update your db
foreach($neworderarray as $order=>$id){
    //إعدادات الاتصال بقاعدة البيانات
    $con = mysql_connect("host","username","password");

    if (!$con){
         die('Could not connect: ' . mysql_error());
    }

    mysql_select_db("my_db", $con);

    mysql_query("UPDATE table SET order = {$order} WHERE id = {$id}");
    mysql_close($con);

}
-
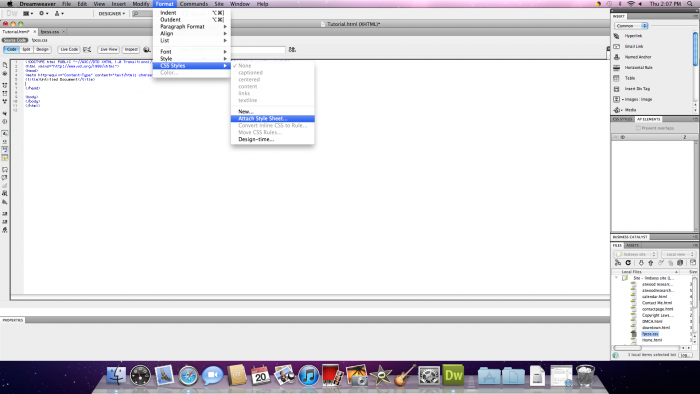
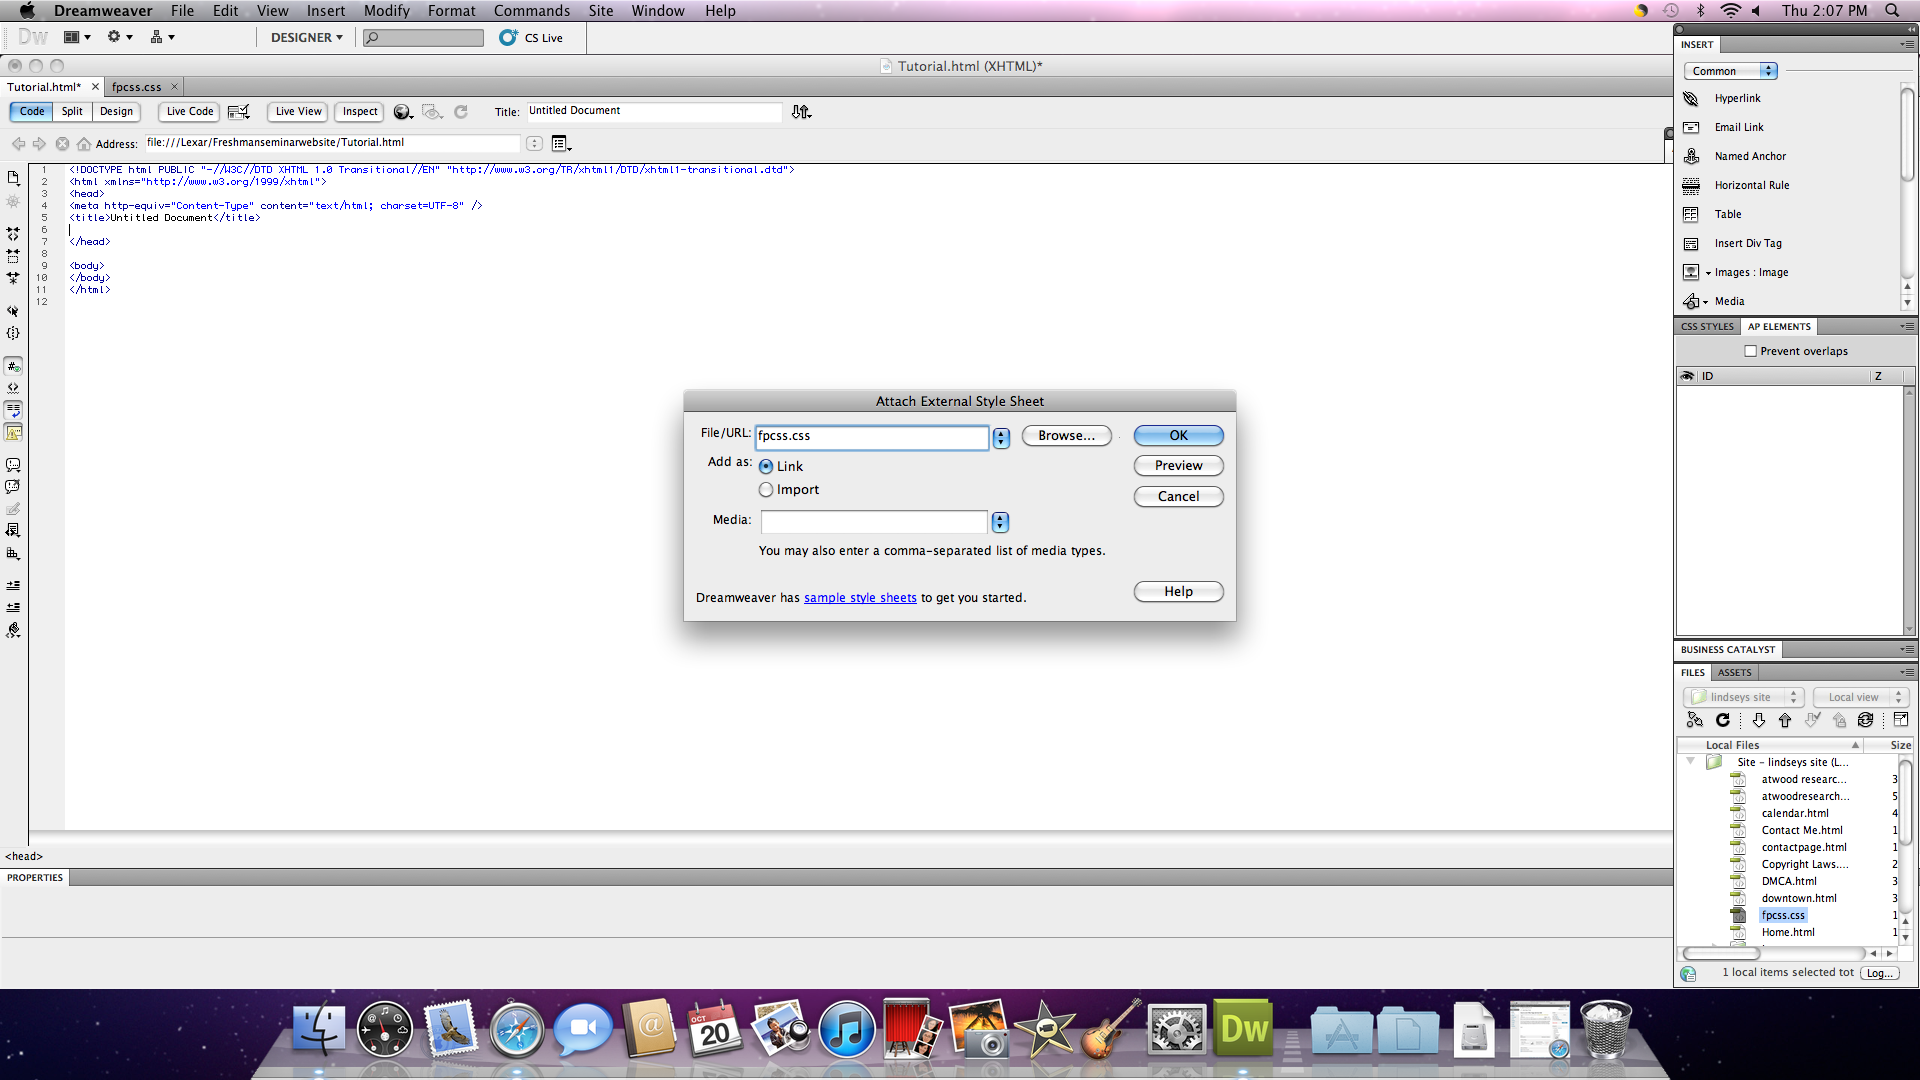
من خلال القائمة التالية:
Format > CSS Styles > Attach Style Sheet
ستتمكن من إضافة ملف التنسيق css:
لتتمكن بعد ذلك من حفظ الملف بالإسم المراد حفظه به:
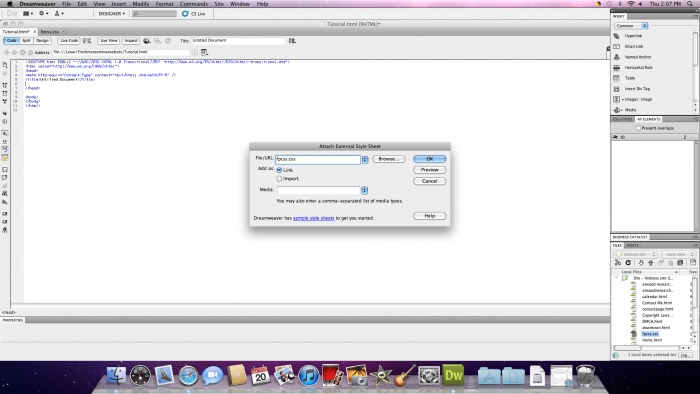
الآن ملف css المسؤول عن تنسيق الصفحة تم ربطه بملف html.
-
نعم هو بالأمر الطبيعي، حيث أن متغير Session له مدة صلاحية نعبر عنها بالمتغير :
$_SESSION['expire']فمثلا لجعل Session تحتفظ بالقيمة المُخزنة بها لمدة 30 دقيقة يكفي كتابة الكود التالي:
$_SESSION['expire'] = $_SESSION['start'] + (30 * 60);
كما يمكن أيضا إنهاء وإفراغ Session من القيم المُسجلة بداخله عن طريق استعمال:
session_destroy();
المصدر :
-
بعد بعض البحث، وجدت الآتي:
Page:
public partial class MyPage : PhoneApplicationPage
{
	protected override void OnBackKeyPress(CancelEventArgs e)
	{
		if (YouTube.CancelPlay()) // used to abort current youtube download
			e.Cancel = true;
		else
		{
			// your code here
		}
		base.OnBackKeyPress(e);
	}

	protected override void OnNavigatedTo(NavigationEventArgs e)
	{
		YouTube.CancelPlay(); // used to reenable page
		SystemTray.ProgressIndicator.IsVisible = false;

		// your code here

		base.OnNavigatedTo(e);
	}

	private async void OnButtonClick(object o, RoutedEventArg e)
	{
		SystemTray.ProgressIndicator.IsVisible = true;
		try
		{
			await YouTube.PlayWithPageDeactivationAsync(
				"Zln9I9IttLA", true, YouTubeQuality.Quality480P);
		}
		catch (Exception ex)
		{
			SystemTray.ProgressIndicator.IsVisible = false;
			MessageBox.Show(ex.Message);
		}
	}
}
OnKeyBackPress Methode:
public partial class MyPage : PhoneApplicationPage
{
	public MyPage()
	{
		...
		AddBackKeyPressedHandler(YouTube.HandleBackKeyPress);
	}

	...
}
كود Xaml الخاص بالقارئ:
<MediaElement x:Name="player" Width="480" Height="320" />
كود قراءة الفيديو:
var url = await YouTube.GetVideoUriAsync(youTubeId, YouTubeQuality.Quality720P);
if (url != null)
{
	player.Source = url.Uri;
	player.Play();
}
else
	// TODO show error (video uri not found)
لقراءة الفيديو خارجيا:
var youTubeId = "yourYouTubeId";
try
{
    //// TODO: Show progress bar
    var uri = await YouTube.GetVideoUriAsync(youTubeId, YouTubeQuality.Quality1080P);
    if (uri != null)
    {
        var options = new LauncherOptions();
        options.ContentType = "video/mp4";
        await Launcher.LaunchUriAsync(uri.Uri, options);
    }
    else
        throw new Exception("no_video_urls_found");
}
catch (Exception exception)
{
    //// TODO: Show exception
}
finally
{
    //// TODO: Hide progress bar
}
المصدر:
-
الخطأ في الكود المُرفق في السؤال هو في عدم توفر متغير to$ على عنوان بريد إلكتروني.
وهذا مثال تطبيقي، قد جرب وتوصَل صاحب البريد بالرسالة:
<?php
$to      = 'nobody@example.com';
$subject = 'the subject';
$message = 'hello';
$headers = 'From: webmaster@example.com' . "\r\n" .
    'Reply-To: webmaster@example.com' . "\r\n" .
    'X-Mailer: PHP/' . phpversion();

mail($to, $subject, $message, $headers);
?>
-
Eltriki،الآن وبعد تنصيبك لسكريبت ووردبريس، ما عليك سوى إعطاء اسم المستخدم وكلمة المرور الخاصة بالموقع إلى المصمم -أو المبرمج- للدخول إلى لوحة التحكم لإجراء التعديلات المراد إضافتها للقالب، حيث أن المبرمج سيحتاج إلى استعمال لوحة التحكم لإضافة إضافات ووردبريس وأيضا سيغير على مجلد القالب في حالة احتاج ذلك.
من الناحية الأمنية لا تخف، فقط عند الانتهاء من جميع التعديلات قم بتغيير اسم المستخدم وكلمة المرور لتضمن أن الوحيد القادر على ولوج لوحة تحم الموقع.
-
محب، كملاحظة مبدئية: التنسيق المذكور في سؤالك سؤدي إلى تغيير مقاسات جميع الصور الموجودة داخل موقعك، وذلك لأنك لم تحدد أي صورة تريد تغيير مقاساتها :
img {height: 200px; width: 300px;}
أي أن عليك تحديد تعيرف Id أو كلاس class المُحددة للصورة -أو الصور- المراد تغيير مقاساتها.
على نظام إدارة المحتوى ووردبريس، وكأي نظام آخر يتحكم ملف التنسيق css في مقاسات وخصائص الوسوم الموجودة على ملف html.
يوفر ووردبريس إمكانية تحديد مقاس الصور قبل إدراجها في الموقع وذلك من خلال إضافة Media من خلال لوحة التحكم:
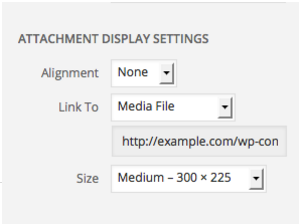
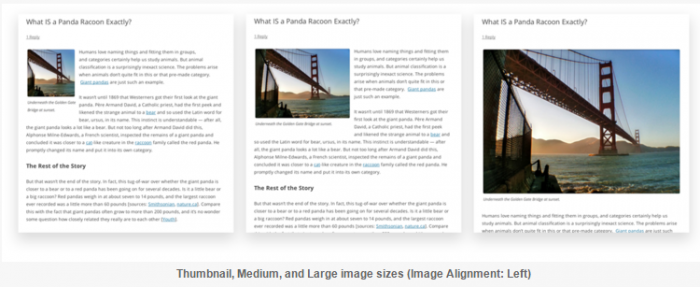
أيضا يمكن تحديد مقاس الصورة من خلال أربع مقاسات معيارية محددة مسبقا :
- Thumbnail
- Medium
- Large
- Full Size
يمكنك استخراج اسم صورة واستعماله لتحديد تنسيقها الخاص بها فقط، من خلال لوحة التحكم عن طريق Advanced Image Settings:
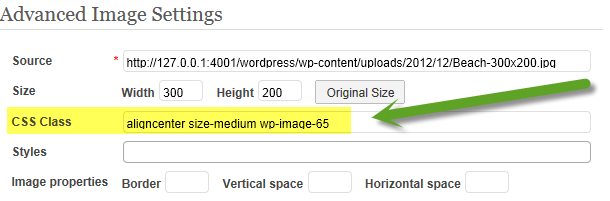
واستخدام ملف التنسيق css لذلك:
aligncenter size-medium wp-image-65
.wp-image-65 { width: 100px; height: 150px; box-shadow: 0px 0px 20px #000000; -webkit-box-shadow: 0px 0px 20px #000000; -moz-box-shadow: 0px 0px 20px #000000; } -
حقيقة السؤال نوعا ما مبهم، لكن على أي في لغة C# يمكن تحويلDecimal إلىBinary، وأظن أن هذا ما تبحث عنه، فإليك الطريقة لفعل ذلك:
//تعريف متغير من نوع Int
int value = 8;
//binaryتحويله إلى
string binary = Convert.ToString(value, 2);
فيديو توضيحي:
-
بصرف النظر عن اللغة المستعملة، أنصحك بالبحث في لغةPython حيث أنها تتوفر على مكتبة مخصصة لهذا الغرض، أي مقارنة صورتين وأشياء أخرى، وأتحدث هنا عن OpenCv، وتعتمد هذة المكتبة على تقسيم الصورة إلى مجموعة نقط بالاعتماد على خوارزميات معقدة نوعا ما، ليتن مقارنة مختلف النقط الموجودة على الصورتين، وفي حالة تواجد تطابق بنسبة كبيرة، آنذاك يمكن القول بأن الصورتين متشابهتين.
يمكنك الاستفادة من هذا الكود:
#original data, two 2x2 images, normalized
x = rand(2,2)
x/=sum(x)
y = rand(2,2)
y/=sum(y)

#initial guess of the flux matrix
# just the product of the image x as row for the image y as column
#This is a working flux, but is not an optimal one
F = (y.flatten()*x.flatten().reshape((y.size,-1))).flatten()

#distance matrix, based on euclidean distance
row_x,col_x = meshgrid(range(x.shape[]),range(x.shape[1]))
row_y,col_y = meshgrid(range(y.shape[]),range(y.shape[1]))
rows = ((row_x.flatten().reshape((row_x.size,-1)) - row_y.flatten().reshape((-1,row_x.size)))**2)
cols = ((col_x.flatten().reshape((row_x.size,-1)) - col_y.flatten().reshape((-1,row_x.size)))**2)
D = np.sqrt(rows+cols)

D = D.flatten()
x = x.flatten()
y = y.flatten()
#COST=sum(F*D)

#cost function
fun = lambda F: sum(F*D)
jac = lambda F: D
#array of constraint
#the constraint of sum one is implicit given the later constraints
cons  = []
#each row and columns should sum to the value of the start and destination array
cons += [ {'type': 'eq', 'fun': lambda F:  sum(F.reshape((x.size,y.size))[i,:])-x[i]}     for i in range(x.size) ]
cons += [ {'type': 'eq', 'fun': lambda F:  sum(F.reshape((x.size,y.size))[:,i])-y[i]} for i in range(y.size) ]
#the values of F should be positive
bnds = (, None)*F.size
*ملاحظة في حال كنت تستخدم تطبيق ويب بلغة php يمكنك استخدام python أيضا، وذلك عن طريق الدالة exec.
-
1
-
-
عزيزي نور الدين شكرا جزيلا لردك الوافي نبهتني للعديد من النقاط الان انا شفت القالب وهو قالب وردبريس ووجدت ان مصمم القالب وضع له شرح فيديو لطريقة التنصيب وسأقوم بتنصيبه ان شاء الله بكل سهولة لحد هذه النقطة فهمت جيدا لكن بعد ذالك لدي الكثير جدا من التعديلات على القالب بالاضافة لترجمته واضافات اخري له في هذه الحاله كيف اتصرف بما ان المصمم والمبرمج سيقومو بالتعديل هل اعطيهم بيانات الاستظافة ولوحة التحكم او هناك طريقة اخري متبعة .؟منصة ووردبريس مميزة جدا، حيث توفر لغير العارفين في مجال البرمجة والتصميم لوحة تحكم واضحة وسهلة الاستخدام، ومن أهم النقاط التي يتميز بها إطار العمل هذا -ووردبريس- هي إمكانية تحميل القالب على هيئة Zip ، أي أنك ستوظف مستقلا لتصميم القالب أو تعريبه وإضافة أي إضافات أنت تحتاجها في موقعك -أي أنه سيصنع لك قالبا-، لتكون نتيجة عمله ملف مضغوط، وكل ما عليك هو تحميل الملف من خلال لوحة التحكم وكذا تفعيل القالب المُحمل ليُعتمد في المدونة.
في هذه الحالة لن تعطي الاستضافة لأي أحد، لأن العملية جد سهلة.
بعد تنصيبك للقالب، من الجيد فحصه والتأكد من النقاط المتفق عليها مع المبرمج، هل أُدرجت بشكل صحيح أم لا؟
-
1
-
-
هناك حالتين اثنتين، تتحكمان في كيفية تصرفك، وكلاهما تتعلقان بمدى إدراكك ومعرفتك بكيفة نقل ملفات الموقع إلى الإستضافة عبر أحد البرامج ولنقل fileZilla المعرف والمنتشر بين وسط المبرمجين والمصممين:
- في حال كنت ملما بالطريقة وتعرف كيفية نقل هذه الملفاتن وكذا على دراية كبيرة بإعداد الخادم -إذا ما احتجت إلى ذلك-، هنا لا أنصحك بإعطاء كلة السر للمصمم لكي يقوم هو برفع الملفات، وإنها قم بها أنت.
- الحالة الثانية، وهي أنك غير ملم بالموضوع، هنا لا عليك، ستختار مصمما يقوم هو بتصميم وبرمجة الموقع ليرفعه فيما بعد -على أن تضيف ثمن عملية نقل الملفات غيى ثمن الوظيفة-، لتقوم فيما بعد بتغيير كلمة سر الدخول إلى حساب ftp الخاص بالسيرفر -الخادم-.
-
1
-
المشكل ببساطة هو استعمالك لرمز - أو مايطلق عليه بـ Hyphen في تسمة أحد الحقول (source_of-salary)، وذلك أن استعماله داخل جملة استعلام Mysql دون علامة ' يخلق مشكلا لدى المعالج داخل Mysql.
وبالضبطعند استعمالك لحقل source_of-salary داخل جملة الاستعلام خاصتك.
طرق حل المشكل:
- تغيير اسم الحقل، وهذا أنصحك به في حالة كنت بدأت للتو في مشروعك، وذلك لتفادي مثل هذه المشاكل مستقبلا، وكمقترح غيره لـ 'source_of_salary'.
- استعمل علامة ' مؤطرة لاسم الحقل 'source_of-salary'.
mysql using (-) dash in mysql column name.
-
1
-
إليك هذا السكريبت والذي هو مشابه لمشروع the Manhattan Virtual Classroom ، من خلال رابط Github، ويعتمد السكريبت على لغة Php كلغة برمجة.
التقنيات المستعملة بداخله هي:
- HTML5 - Page structure
- CSS3 - Styling
- PHP - Backend stuff
- JavaScript - Frontend stuff
- Node.js , Now.js, Socket.io – for real-time chat
- MySQL - Database
مبني على إطار العمل CodeIgniter.
من جهة أخرى يمكنك الإستعانة بمشروع مبني على تقنية node.js يوفر غرف تعليمية، وذلك باستعمال كل من webRTC و Websocket، وهذا هو رابط المشر وع.
-
1
-


كيف اضافة كودي (المشاركة Share و الارسال Send) الى اكتفتي Navigation Drawer
في أسئلة البرمجة
نشر
تمكنك برمجة تطبيقات اندرويد من مشاركة وإرسال محتوى معين مع تطبيق آخر، سواء أكان المحتوى نص، صور أو أي محتور آخر, ويُستعمل الكود التالي لارسال قطعة نص لتطبيق آخر:
لإرسال محتور Binary (صورة، فيديو...):
في حال كنت تريد إرسال عدة مكونات دفعة واحدة:
بالنسبة لاستقبال محتوى مبعوث من تطبيقات أخرى، ماعليك سوى :
تغيير كود Manifest:
استقبال المحتوى المُرسَل:
أيضا يمكن مشاركة المحتوى من خلال : Sharing Data و Sharing Files with NFC.