

E.Nourddine
-
المساهمات
1458 -
تاريخ الانضمام
-
تاريخ آخر زيارة
-
عدد الأيام التي تصدر بها
18
نوع المحتوى
ريادة الأعمال
البرمجة
التصميم
DevOps
التسويق والمبيعات
العمل الحر
البرامج والتطبيقات
آخر التحديثات
قصص نجاح
أسئلة وأجوبة
كتب
دورات
كل منشورات العضو E.Nourddine
-
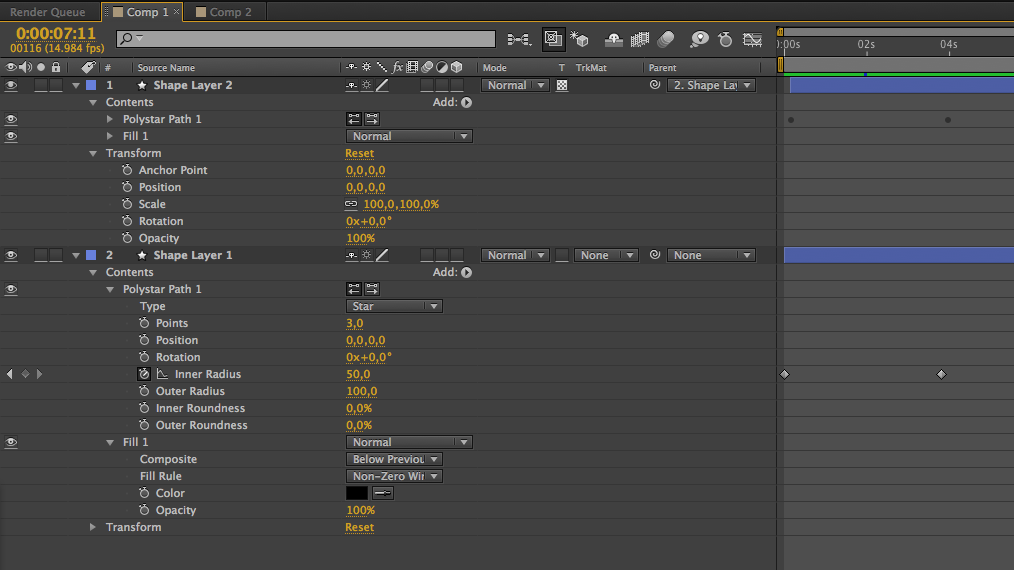
نعم يمكنك فعل ذلك، وذلك باتباع الخطوات التالية: انقل الصورة إلى خط الزمن -timeline- مع تحديد خاصية alpha في خصائص الصورة.اضغط على زر 'Track Motion' من خلال رأس Track.حدد النمط 3D Source Alpha.استعمل KeyFrames لإنشاء التحريك 'animation'.
-
هذه الدالة بإمكانها إعادة رابط القالب الحالي المستعمل على نظام ووردبريس: get_bloginfo('template_directory'); في المقابل يمكن استخدام دالة bloginfo والتي تتيح عرض مسار القالب على المتصفح، وتستعمل بهذا الشكل: bloginfo('template_directory'); فيما يتعلق باستعمال رابط القالب من أجل الوصول إلى مسار ملف الصور المخزنة على النظام، يمكن الاستفادة من الدالة السابقة، وذلك بإدراجها في وسم <img> وإعطائها للخاصية src، لنتمكن في آخر المطاف من الوصول إلى المجلد 'images' بهذه الطريقة: <img src="<?php bloginfo('template_directory'); ?>/images/headers/image.jpg" /> لاحظ جيداً أنه تم الاستعانة بقطعة نصية 'image/headerimage.jpg/' لتكملة المسار الصحيح للصورة، وهذا يبرز جليا مرونة نطام ووردبريس وسهولة استعمال دواله بشكل مريح.
-
()is_front_page : تُعيد القيمة True إذا كان المستخدم يتصفح صفحة (page) أو صفحة عرض المنشورات، حيث يُمكننا تعيين خاصية front_page لصفحة ما من خلال لوحة التحكم أي من خلال: Settings->Reading->Front page displays بطريقة أخرى أن صفحة about us سترجع لنا القيمة true في حال كانت تتوفر على هذه الخاصية. ()is_home : تُعيد القيمة True في صفحة عرض المنشورات الأخيرة، كحالة عرض أخر المنشورات العشر. ويمكن أيضا تعيين خاصية is_home من نفس مكان الإعدادات المذكورة في خاصية is_front_page. من الأمثلة المستعملة لصفحات is_home: عرض آخر الأخبار (المنشورات) في صفحة باسم News.عرض المستخدمين الأكثر تفاعلا على الموقع active_users.
-
يمكننا استعمال الموقع explainshell.com: ?$echo ls >> $File 2>&1خلاصة الأمر : echo: تستعمل لإظهار سطر نصي.ls : إظهار محتوى مسار بشكل يتيح للمستخدم رؤية جميع الملفات الموجودة داخله.
-
من خلال ملف config/main.php : // application components 'components'=>array( // ... 'clientScript'=>array( 'packages'=>array( 'jquery'=>array( 'baseUrl'=>'//ajax.googleapis.com/ajax/libs/jquery/1/', 'js'=>array('jquery.min.js'), ) ), ), // ... ),كما يمكنك إضافته في ملف المتحكم: <?php $baseUrl = Yii::app()->baseUrl; $cs = Yii::app()->getClientScript(); $cs->registerScriptFile($baseUrl.'/js/yourscript.js'); $cs->registerCssFile($baseUrl.'/css/yourcss.css'); ?>وهذا مثال لإدراج ملفات javascript في جميع action على إطار العمل: public function beforeAction($action) { if( parent::beforeAction($action) ) { /* @var $cs CClientScript */ $cs = Yii::app()->clientScript; /* @var $theme CTheme */ $theme = Yii::app()->theme; $cs->registerPackage('jquery'); $cs->registerPackage('history'); $cs->registerScriptFile( $theme->getBaseUrl() . '/js/highlight.js' ); $cs->registerScriptFile( $theme->getBaseUrl() . '/js/jquery.ba-dotimeout.min.js' ); $cs->registerScriptFile( $theme->getBaseUrl() . '/js/jquery.scrollTo-1.4.3.1-min.js' ); //$cs->registerScriptFile( $theme->getBaseUrl() . '/js/jquery.scrollTo-min.js' ); $cs->registerScriptFile( $theme->getBaseUrl() . '/js/script.js' ); $cs->registerCssFile($theme->getBaseUrl() . '/css/reset.css'); $cs->registerCssFile($theme->getBaseUrl() . '/css/main.css'); return true; } return false; }
-
بالنسبة لملفات pdf، وأقصد هنا الملفات التي تم إنشاءها على أحد البرامج المخصصة لذلك- مثل Indesign -، وليس صور ممسوحة بواسطة الماسح الضوئي، أي أنها ليست صور ضوئية، لأنها في هذا الحالة الأخيرة لا يمكن التعرف على نوع الخط بشكل أو بآخر، بينما في حالة ملف pdf، يمكن الوصول إلى نوع الخط المستعمَل في الملف من خلال قائمة برنامج Adobe Reader: File menu > Properties > Fonts لتظهر بعد ذلك لائحة بأنواع الخطوط المُستعملة في الملف. يمكنك أيضا جلب نوع الخط المستعمل في قطعة نصية معينة، وهذه الخاصية لا تتوفر على نسخ Adobe Reader المجانية فقط - Adobe Acrobat X Pro -، حيث بعد القيام بتحديد النص والضغط عليه بزر الفأرة الأيمن ستظهر لائحة اختيارات حدد Properties اختر الجزء الخاص بـ Text ليُظهر لك كل خصائص النص المُحَدد ومن بينها نوع الخط المُستعمل.
-
غالبا في الوظائف وبشكل عام - ليس في التصميم فقط-، يختلف سعر المستقل من شخص لآخر، حسب الخبرة والاحترافية التي يتسم بها المستقل، وبما أنك بصدد العمل على وظيفة ستأخذ منك يومين من العمل، أقترح عليك تحديد سعر الساعة الواحدة لديك - ولنقل 10دولار للساعة، على اعتبار أنك ذو مستوى متوسط تتقن وظيفتك بشكل جيد-، سيبقى عليك تقدير عدد ساعات العمل التي سيأخذها منك العمل - الوظيفة- ليكون سعر الوظيفة كامل هو خارج ضرب سعر الساعة في عدد ساعات العمل على الوظيفة. وقد تحتاج إلى إضافة بعض الساعات كاحتياط، حيث من الممكن أن تحتاج إليها للقيام ببعض التعديلات المطلوبة من العميل، أو قد تحتاجها في حين استعصت عليك بعض الأمور التي قد تحتاج إلى البحث عنها مما سيأخذ منك بعض الوقت . عامة:سعر الوظيفة = سعر الساعة الواحدة * عدد ساعات العمل.
-
التصميم المُتجاوب هو تجاوب التصميم مع مقاسات الشاشة العارضة للتصميم، مما يسمح للتصميم بالتأقلم مع الشاشة العَارضة له، ولا دخل لدقتها أو مميزاتها التقنية في هذه الحيثية، حيث نجد نفس التصميم في أنواع مختلفة من الهواتف الذكية -تختلف في معايير دقتها ..- ولها نفس المقاس -الطول*العرض-. ويعتمد المصممون في تصميماتهم المتجاوبة على إدراج أدق التفاصيل وخاصة في تصاميم الهواتف الذكية، حيث تتسم بضيق مساحة العرض، مما يُلزم المصمم إبراز أهم الخصائص في التصميم وإعطاءها الأولوية، عكس تصاميم الشاشات الكبيرة الموجودة على الحواسيب. كخلاصة: التصميم المُتجاوب يتعلق بالأساس بمقاسات شاشات العرض، وليس دقتها. المزيد
-
استعمل : INSERT IGNORE INTO table والتي مهمتها إدخال القيم في الجدول بعد التأكد من عدم وجودها سلفاً، وفي حالة وجود قيم سابقة تُلغى عملية إدخال القيم الحالية ليتم الانتقال إلى القيم التالية. مثال: إنشاء الجدول:CREATE TABLE `transcripts` ( `ensembl_transcript_id` varchar(20) NOT NULL, `transcript_chrom_start` int(10) unsigned NOT NULL, `transcript_chrom_end` int(10) unsigned NOT NULL, PRIMARY KEY (`ensembl_transcript_id`) ) ENGINE=InnoDB DEFAULT CHARSET=latin1;استعمال Insert Ignore Into Table:INSERT IGNORE INTO `transcripts` SET `ensembl_transcript_id` = 'ENSORGT00000000001', `transcript_chrom_start` = 12345, `transcript_chrom_end` = 12678;أيضا يمكن استعمال INSERT … ON DUPLICATE KEY UPDATE والتي من شأنها تغيير القيم في حالة تواجد قيمة شبيهة بها، وهذا مثال تطبيقي:INSERT INTO table (a,b,c) VALUES (1,2,3) ON DUPLICATE KEY UPDATE c=c+1; UPDATE table SET c=c+1 WHERE a=1;في حال كانت قيم الحقول a,b,c هي 1,2,3 موجودة مسبقا في الجدول، سيتم تغييرها بإضافة 1 إلى قيمة الحقل c، وهذا ما تعنيه : ON DUPLICATE KEY UPDATE c=c+1;
-
على لغة php وفيما يتعلق بالمصفوفات سنجد الدالة ()reset والتي تحرك المؤشر pointer إلى العنصر الأول من المصفوفة ، أي يمكن من خلالها إرجاع القيمة الأولى من المصفوفة، وتُرجع القيمة false في حال كانت المصفوفة فارغة. أي يمكن استعمال هذه الدالة بالشكل التالي: $arr = array( 4 => 'apple', 7 => 'orange', 13 => 'plum' ) echo reset($arr); //echoes "apple": ستظهر لنا القيمةكما يمكننا استخراج قيمة المفتاح key باستعمال الدالة Key: echo Key($arr); //4 قيمة المفتاح الأول في المصفوفة دالة reset
-
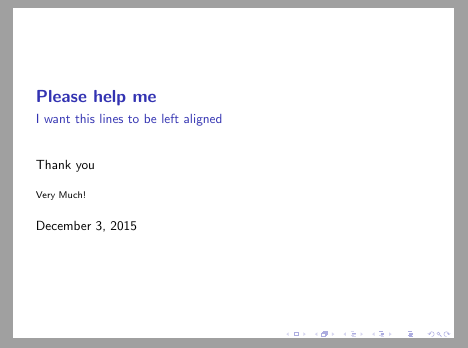
في حال كنت تريد محاذاة عنوان الصفحة فقط إلى الجهة اليسرى عليك استعمال خاصية left داخل قالب titlepage, نستعمل Boadilla في innerthemeعلى titlepage بالشكل التالي: \setbeamertemplate{title page}[default][colsep=-4bp, rounded=true, shadow=\beamer@themerounded@shadow]وفي حالة أردنا استعمال عنوان فارغ للصفحة :{thispagestyle{empty/ ليكون كود وثيقتنا بالشكل: \documentclass{beamer} \usetheme{Boadilla} \title{\textbf{Please help me}} \subtitle{I want this lines to be left aligned} \author{Thank you} \institute{Very Much!} \makeatletter \setbeamertemplate{title page}[default][left,colsep=-4bp,rounded=true,shadow=\beamer@themerounded@shadow] \makeatother \begin{document} \begin{frame}[plain] % \thispagestyle{empty} \titlepage \end{frame} \end{document}وهذا مثال بسيط لما يمكن الحصول عليه:
-
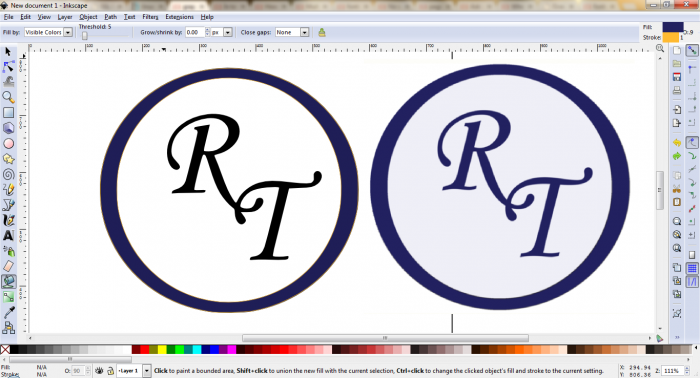
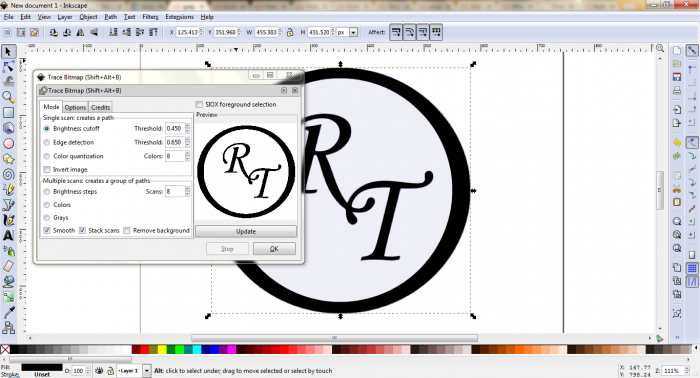
أولا من الجيد استعمال الصيغة bitmap للصور الصغيرة على برنامج Inkscape وذلك بغرض تصديرها إلى صيغة pdf التي تلاءم أكثر برنامج LaTex: من القائمة Path>Trace Bitmap : عملية التلوين، لتغيير لون الأيقونة: ثم تصدير الصورة بصيغة Pdf من خلال القائمة save as: في حالتنا سنحصل على أيقونة برنامج Skype: الآن يمكنك اضافة الأيقونة بالطريقة التالية: \makeatletter \newcommand*{\skypesocialsymbol}{\includegraphics[height=.7\baselineskip]{skype_gray}} \collectionadd[skype]{socials}{ SK} \makeatotherرأس الصفحة بعد اضافة العديد من الأيقونات سيكون بالشكل التالي: باضافة الكود التالي: \documentclass[11pt,a4paper,sans]{moderncv} % possible options include font size ('10pt', '11pt' and '12pt'), paper size ('a4paper', 'letterpaper', 'a5paper', 'legalpaper', 'executivepaper' and 'landscape') and font family ('sans' and 'roman') % moderncv themes \moderncvstyle{casual} % style options are 'casual' (default), 'classic', 'banking', 'oldstyle' and 'fancy' \moderncvcolor{blue} % color options 'black', 'blue' (default), 'burgundy', 'green', 'grey', 'orange', 'purple' and 'red' %\renewcommand{\familydefault}{\sfdefault} % to set the default font; use '\sfdefault' for the default sans serif font, '\rmdefault' for the default roman one, or any tex font name %\nopagenumbers{} % uncomment to suppress automatic page numbering for CVs longer than one page \makeatletter \newcommand*{\skypesocialsymbol}{\includegraphics[height=.7\baselineskip]{skype_gray}} \collectionadd[skype]{socials}{ SK} \makeatother ...


- 1 جواب
-
- 1
-

-
تحدد المعطيات التالية كيف تعرّف ORM maps قيم حقول blank & null على Django1.8 class Test(models.Model): charNull = models.CharField(max_length=10, null=True)// موجود charBlank = models.CharField(max_length=10, blank=True)// موجود charNullBlank = models.CharField(max_length=10, null=True, blank=True) intNull = models.IntegerField(null=True) intBlank = models.IntegerField(blank=True) intNullBlank = models.IntegerField(null=True, blank=True) dateNull = models.DateTimeField(null=True) dateBlank = models.DateTimeField(blank=True) dateNullBlank = models.DateTimeField(null=True, blank=True) قواعد البيانات PostgreSQL 9.4: CREATE TABLE Test ( id serial NOT NULL, "charNull" character varying(10),//موجود "charBlank" character varying(10) NOT NULL,// غير موجود "charNullBlank" character varying(10), "intNull" integer, "intBlank" integer NOT NULL,// غير موجود "intNullBlank" integer, "dateNull" timestamp with time zone, "dateBlank" timestamp with time zone NOT NULL, "dateNullBlank" timestamp with time zone, CONSTRAINT Test_pkey PRIMARY KEY (id) )ثم MySQL 5.6: CREATE TABLE Test ( `id` INT(11) NOT NULL AUTO_INCREMENT, `charNull` VARCHAR(10) NULL DEFAULT NULL, `charBlank` VARCHAR(10) NOT NULL, `charNullBlank` VARCHAR(10) NULL DEFAULT NULL, `intNull` INT(11) NULL DEFAULT NULL, `intBlank` INT(11) NOT NULL, `intNullBlank` INT(11) NULL DEFAULT NULL, `dateNull` DATETIME NULL DEFAULT NULL, `dateBlank` DATETIME NOT NULL, `dateNullBlank` DATETIME NULL DEFAULT NULL )بعبارة أخرى شاملة، blanck غير موجود على قواعد البيانات، بخلاف يُسمح بنوع Null عليها. Django tips: the difference between ‘blank’ and ‘null’
-
من خلال مكتبة subprocess module يمكن استدعاء الأوامر الخارجية عن Pyhton بالطريقة التالية: from subprocess import call call(["ls", "-l"])في حال كان الأمر يحتاج لقيم مُدخلة : import subprocess subprocess.call("command-name-here") subprocess.call(["/path/to/command", "arg1", "-arg2"])استدعاء برنامج بامتداد exe: import win32api try: win32api.WinExec('notepad.exe') except: pass How to call/execute an external command/programExecute External Programs, the Python Ways
-
جرّب هذه الشيفرة والتي تقوم بترتيب المصفوفة ذات الأبعاد المتعددة: if ($a['num'] == $b['num']) { return 0; } return ($a['num'] < $b['num']) ? -1 : 1; }مثال آخر لطريقة الترتيب: foreach ($mdarray as $key => $row) { // indexتعويض 0 بقيمة $dates[$key] = $row[0]; } array_multisort($dates, SORT_DESC, $mdarray);
-
يجب معرفة بعض أساسيات البرمجة على Rails، حيث أن الكائنات Objects هو من نوع Enumerable of ActiveModel objects مع المتغيرات anonymous_user_id،choice_index،وlegende : objects.map {|obj| obj.values_at(:anonymous_user_id, :choice_index, :legend) } .group_by(&:shift) بالنسبة لـ Groupe_by استعن بهذا النموذج: MyModel.where(...) .pluck(:anonymous_user_id, :choice_index, :legend) .map {|vals| Hash[ %w[ __key__ c_idx legend ].zip(vals) ] } .group_by {|hsh| hsh.delete("__key__") }أي أن الحل هو : MyModel.where(...) .pluck(:anonymous_user_id, :choice_index, :legend) .each_with_object(Hash.new {|h,k| h[k] = [] }) do |(key, c_idx, legend), hsh| hsh[key] << { "c_idx" => c_idx, "legend" => legend } end
-
الخطأ الأساسي في n = m.country.class == String، وذلك لجعل قيمة n تستقبل قيمة true أو false لأنك حاولت استعمال { reject! {|x| x == current_user.profile.user_id } والتي بالأساس تعيد قيمة متغير boolean، لذا الصحيح هو : def method_name Profile.all.select do |p| p.country.present? && p != current_user.profile end endأو بطريقة أخرى مختصرة : def method_name Profile.where.not(user_id: current_user.id).where.not(country: nil) end
-
يمكنك استخدام ما يلي: var pathname = window.location.pathname; // تعيد المسار فقط var url = window.location.href; // نُعيد الرابط كاملاًوأيضا بهذه الطريقة: var URL = $(location).attr('href'); var PATH = $(location).attr('pathname') ; How to get current URL يمكنك استعمال لغة php لفعل ذلك أيضاً:
-
استعمل : >>> 'hello world'[::-1] 'dlrow olleh' :النتيجية استخدمنا extended slice والتي تأخذ قيمتين، قيمة للبداية وأخرى للنهاية [begin:end:step]، وعند إعطاء القيمة 1- نقصد عندها عكس النص بشكل يُظهر الجملة من آخرها إلى بدايتها. مثال آخر، مصفوفة تتوفر على الأعداد من 0 إلى 9 مرتبة ترتيبا تصاعديا، وعند عكسها نحصل على : >>> L[::-1] [9, 8, 7, 6, 5, 4, 3, 2, 1, 0]مثال آخر: >>> s='abcd' >>> s[::2] 'ac' >>> s[::-1] 'dcba'
-
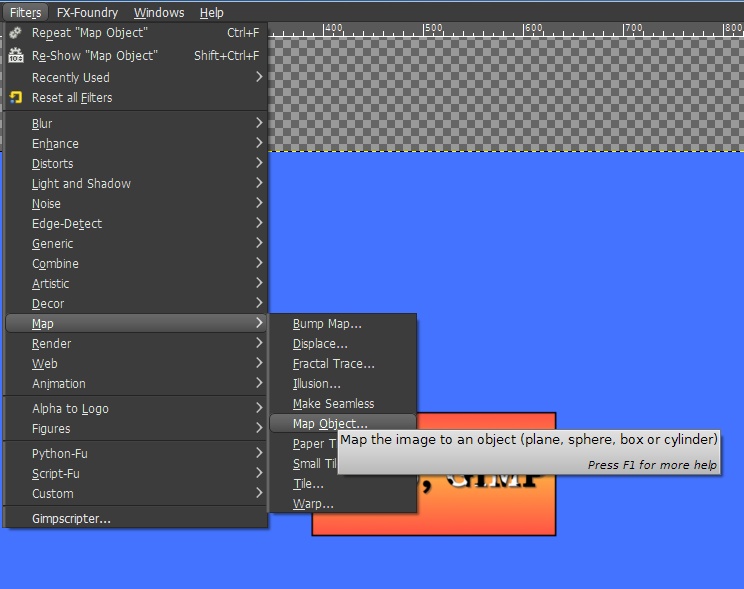
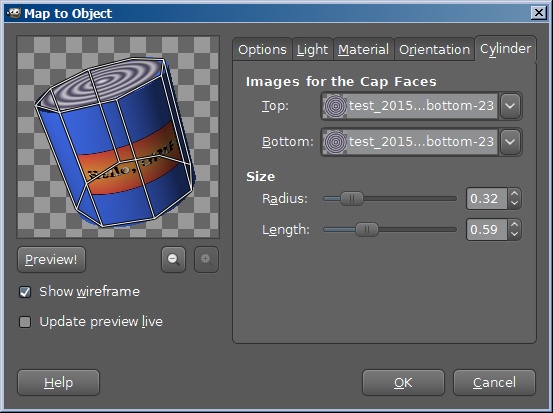
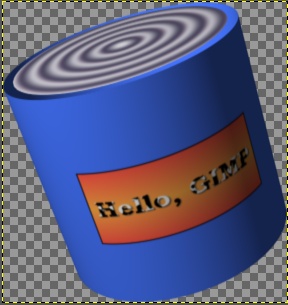
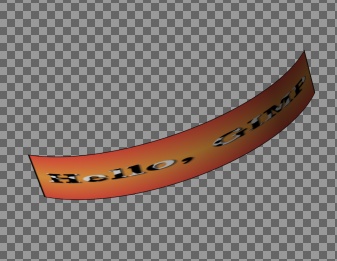
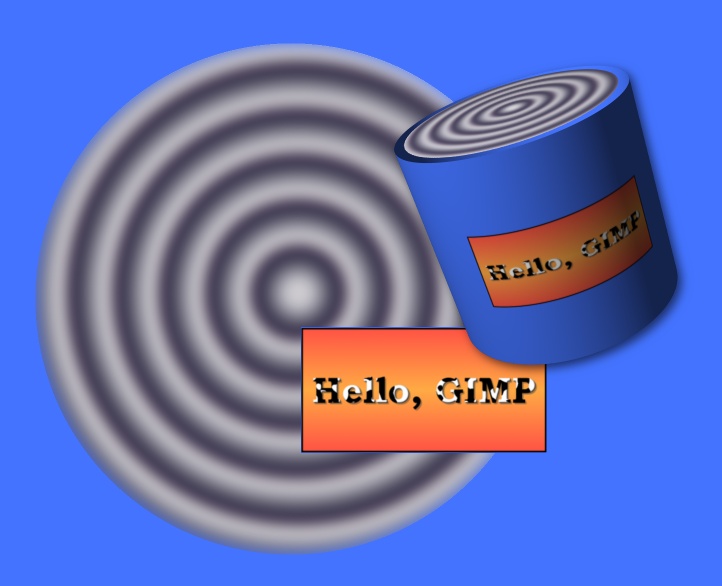
سنقوم بالعميلة على مراحل كالتالي: باعتبار أن هذه هي صورة الغلاف: يجب أن تتوفر على صورة كهذه، والتي ستمثل لنا أسفل - أو أعلى- العلبة الأسطوانية: من القائمة: Filter -> Map -> Map Object نضيف الفلتر التالي: بعض خصائص الفلتر: الصورة النهائية:


-
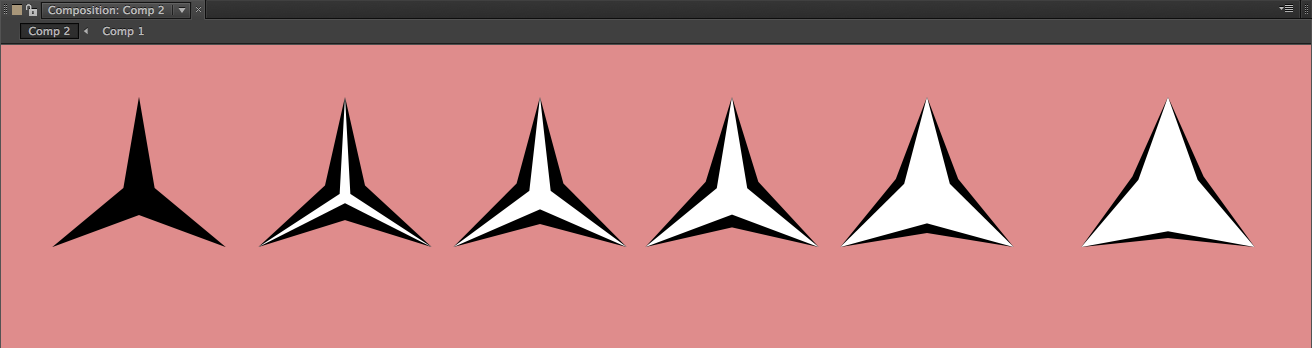
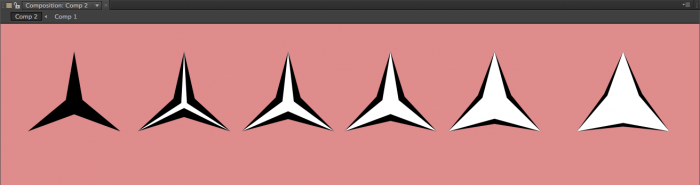
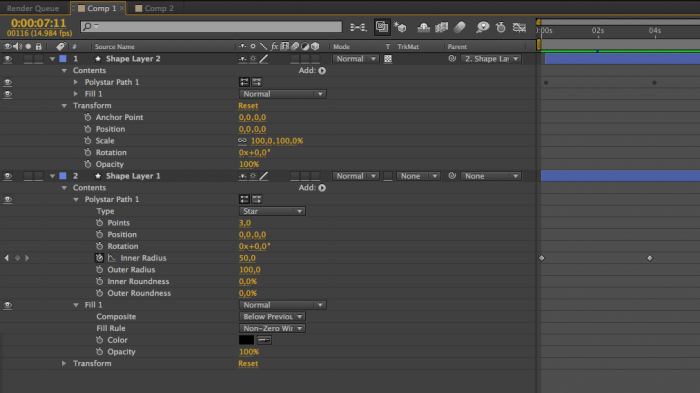
الأمر الأساسي الذي يعتمد عليه المصمم في هذه التقنية وهو تكرار نفس الشكل مع إضافة تغيير طفيف عليه، ثم تأتي عملية التحريك والتي تشمل مختلف الأشكال المنجزة مسبقاً، ليبدو الأمر على أنه تحرّك animation للشكل، هذا مثال على ما تم ذكره: فعند الانتقال من اليمين إلى اليسار يبدو الشكل وكأنه يُغلق ويحُل الأسود مكان الأبيض. في الصورة التالية توضيح لعملية التحريك والانتقال من شكل لآخر:
-
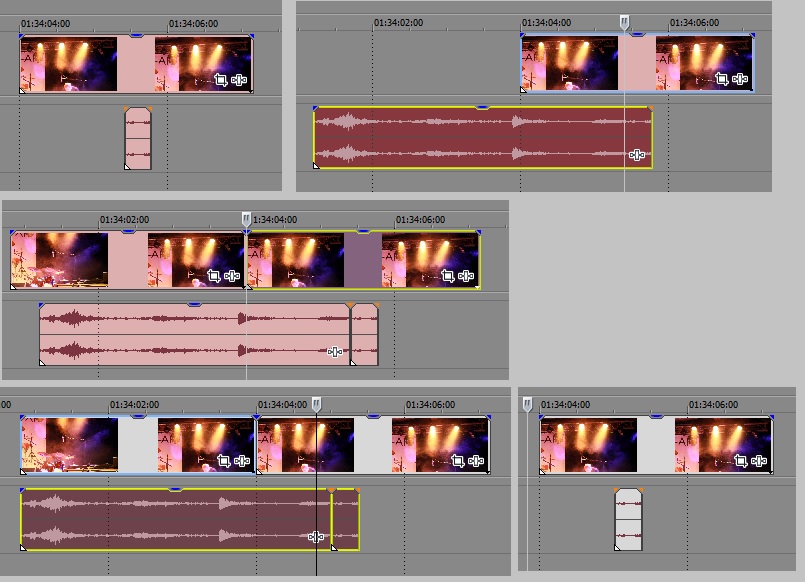
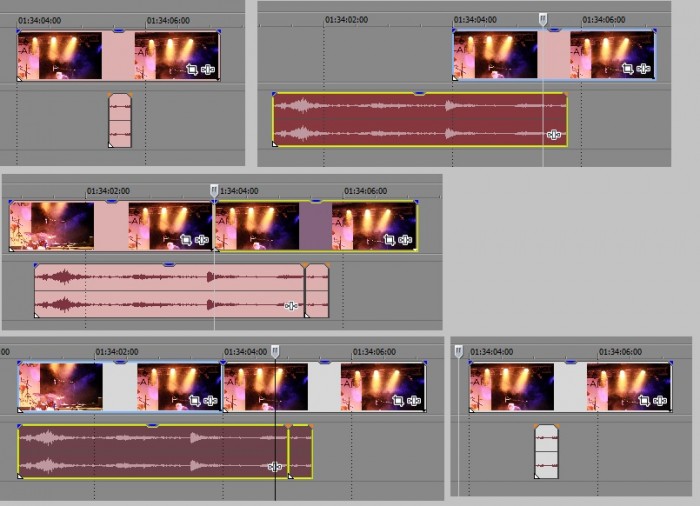
عملية تزامن الصوت مع مقطع الفيديو من الأساسيات التي تقوم عليها عملية المونتاج والتي ترتكز بالأساس على هذه الخطوات: ضع المؤشر على بداية المقطع الصوتي.أزِح المؤشر عن بداية المقطع الصوتي ناحية بداية مقطع الفيديو، وذلك حتى يتوافقان بشكل دقيق، فكل ثانية قد تشكل بالسلب على عملية التزامن.قص المقطع الصوتي وذلك بالضغط على الزر S.كرّر العملية السابقة حسب عدد الفيديوهات الموجودة لديك - في الصورة أتوفر على 3- .الآن يمكنك التأكد من تزامن الفيديو والصوت عن طريق بدء قراءة الصوت والفيديو.يمكنك التعديل على أي مقطع في حالة عدم الحصول على تزامن دقيق.
-
في لغة #C وعند تعريف مصفوفة من نوع<>List فإنه بالأساس نقوم بتعريف نوع محتوى المصفوفة، عكس array والتي من الممكن أن تضم العديد من أصناف المتغيرات، لكن مع ذلك يمكننا تحديد نوع المصفوفة ولأي نوع من المتغيرات قد عُرّفت عن طريق :[myList.GetType().GetGenericArguments()[0 وبشكل مفصل يمكننا أيضا معرفة نوع محتوى المصفوفة List بالشكل التالي: var objectType = myList.GetType(); if (!objectType.IsGenericType() || objectType.GetGenericTypeDefinition() != typeof(List<>)) { throw new InvalidOperationException( " List<T> المصفوفة لاتتوفر على أي عنصر "); } var elementType = objectType.GetGenericArguments()[0];
-
عليك باستعمال فلتر overlay filter. حيث يمكّن هذا الفلتر من وضع الفيديو فوق صورة يتم اختيارها: ffmpeg -loop 1 -i image.png -i video.mp4 -filter_complex "overlay=(W-w)/2:shortest=1" output.mp4 أما إذا كنت تريد ضبط مقاسات الفيديو فعليك بـ scale filter: ffmpeg -loop 1 -i image.png -i video.mp4 -filter_complex "[1:v]scale=400:-1[fg];[0:v][fg]overlay=(W-w)/2:(H-h)/2:shortest=1" output.mp4 كما يمكنك أيضا استعمال مسافة فاصلة بين الفيديو والصورة من الداخل -padding- pad filter : ffmpeg -i video.mp4 -filter_complex "pad=1280:0:(ow-iw)/2" output.mp4
-
يوفر ووردبريس العديد من الدوال التي تفيد المبرمج في مُختلف المهام والخصائص التي يريد من الموقع أن يحتويها، و من بين هذه الدوال التي تسهل عليه كمبرمج، جلب المنشور من خلال Id -رقمه التعريفي- وهي الدالة ()get_post والتي تَقبل كقيمة مُدخلة Id_post، والتي سنستعملها بالشكل التالي: $my_postid = 12;// الذي من سيمكننا من الحصول على المنشورIdهذه هي قيمة $content_post = get_post($my_postid);//جلب المنشور $content = $content_post->post_content; $content = apply_filters('the_content', $content); $content = str_replace(']]>', ']]>', $content); echo $content;// عرض المنشوردالة get_post