كل الأنشطة
- الساعة الماضية
-
 احمد رضا نبيه Ahmed Reda Nabih اشترك بالأكاديمية
 -
 Mina Magdy7 اشترك بالأكاديمية
 -
مرحبا , ليس من الجيد بشكل عام تخزين الصور في قاعدة البيانات في شكل buffer و ذلك لأسباب تتعلق بالperformance و الScalability, ولكن بشكل عام فإذا كنت تستعمل node js فيمكنك فقط تخزين اسم التعريف لكل صورة مثلا تخزن اسم الصورة أنها image_1.png و عند الإستدعاء في الreact يقوم بوضع الurl الخاص بالbackend قبل التعريف مثلا : https://example.com/uploads/image_1.png ________ في حال ما إذا كنت تستعمل next js فأمر تخزين الصور يصبح أكثر تعقيدا خاصة في مراحل الproductions و في تلك الحالة يستحسن إستعمال aws مثال : للتخزين : const s3 = new S3Client({ region: "me-south-1", credentials: { accessKeyId: process.env.AWS_ACCESS_KEY_ID as string, secretAccessKey: process.env.AWS_SECRET_ACCESS_KEY as string, }, }); //___________________________ import { PutObjectCommand } from "@aws-sdk/client-s3"; import generateUniqueId from "../date_id"; export default async function handleUploadFilesS3({ buffer, filename, }: { buffer: any; filename: string; }) { try { let newFileName = `${generateUniqueId()}_${filename.replaceAll( " ", "_" )}`; let command = new PutObjectCommand({ Bucket: process.env.AWS_S3_BUCKET_NAME as string, Key: newFileName, Body: buffer, }); await s3.send(command); return { name: newFileName, ok: true }; } catch (error) { console.log(error); return { error: error, ok: false }; } } للإسترجاع : const games = await prisma.game.findMany(); games.forEach(async (game) => { try { let command = new GetObjectCommand({ Bucket: process.env.AWS_S3_BUCKET_NAME, Key: game.gameImg as string, }); const url = await getSignedUrl(s3, command, { expiresIn: 3600 * 24 }); game.gameImg = url; } catch (err) { console.log(err); } }); ______ كمان يمكنك إستعمال طريقة الaws في المشاريع الخاصة بالnodejs أيضا .
-
 مرحبا عند رفع الصور يتم استعمال الكود التالي : const s3 = new S3Client({ region: "me-south-1", credentials: { accessKeyId: process.env.AWS_ACCESS_KEY_ID as string, secretAccessKey: process.env.AWS_SECRET_ACCESS_KEY as string, }, }); //___________________________ import { PutObjectCommand } from "@aws-sdk/client-s3"; import generateUniqueId from "../date_id"; export default async function handleUploadFilesS3({ buffer, filename, }: { buffer: any; filename: string; }) { try { let newFileName = `${generateUniqueId()}_${filename.replaceAll( " ", "_" )}`; let command = new PutObjectCommand({ Bucket: process.env.AWS_S3_BUCKET_NAME as string, Key: newFileName, Body: buffer, }); await s3.send(command); return { name: newFileName, ok: true }; } catch (error) { console.log(error); return { error: error, ok: false }; } } handleUploadFilesS3 هي دالة تأخذ بعض الarguments الخاصة بال file مثل الbuffer الخاص به و اسم الfile و تقوم بعمل id مميز له ثم رفعة _______________________________ لإسترجاع url لكل image (signed url) و هو يكون url مؤقت و ليس دائم و يمكنك التحكم في مدتة يتم تخزين في الداتابيز اسم الصورة فقط و ليس الurl لان الurl يكون مؤقت و يتم استعمال اسم الصورة لإنشاء الsigned url كالتالي : const games = await prisma.game.findMany(); games.forEach(async (game) => { try { let command = new GetObjectCommand({ Bucket: process.env.AWS_S3_BUCKET_NAME, Key: game.gameImg as string, }); const url = await getSignedUrl(s3, command, { expiresIn: 3600 * 24 }); game.gameImg = url; } catch (err) { console.log(err); } });
 - اليوم
-
 ريفيت للاستشارات والمقاولات اشترك بالأكاديمية
 -
 Dgi Khf اشترك بالأكاديمية
 -
 فرح منير اشترك بالأكاديمية
 -
 Raghad Alaseere اشترك بالأكاديمية
 -
 Mazen Elshikh اشترك بالأكاديمية
 -
 اسلام هاني2 اشترك بالأكاديمية
 -
 Rabie Kurdi اشترك بالأكاديمية
 -
 رشيد بن الحسين اشترك بالأكاديمية
 -
لا بأس يمكنك البدا فى اى وقت شئت ولكن يجب عليك الالتزام بمتابعة الدروس وتطبيق كل ما يتم تعلمه فى الدروس بنفسك حتى تحصل على اقصى استفادة من الدورة . المهم لك اولا هو في البداية بمذاكرة الأساسيات واللغات البرمجية التي تستخدم في تصميم وتطوير واجهات المستخدم . وبعد ذلك قم بمتابعة الدروس العملية حيث فى هذه الدروس ستقوم بالتطبيق العملى على كل ما تعلمته فى الوحدات السابقة . ويجب عليك تخصيص وقت محدد يوميا لمتابعة الدروس حتى لا تمل او تتكاسل فترى ان الوقت قد فاتك وكان من الممكن ان تفعل الكثير حينها . ولا تقلق اذا ما واجهتك اى مشكلة او احتجت اى سؤال فيمكنك السؤال اسفل كل درس فى قسم التعليقات وستجد المدربون متاحين فى جميع الاوقات ومتوفرين لمساعدتك. وهذه بعض الإجابات لطلاب اخرين ستجدها مفيدة لك.
- 1 جواب
-
- 1
-

-
لقد قمت بالتسجيل في هذه الدورة منذ سنتين، وحصلت لي الكثير من الظروف التي جعلتني أبدأ الدراسة للتو، خطة الدراسة ليست واضحة بالنسبة لي.. كيف أتواصل بشكل تفاعلي مع مقدم الدورة ومع الطلاب، وكيف أقوم بالمشاريع العملية فورًا أولًا بأول؟
- 1 جواب
-
- 1
-
-
ماهي طريقة برمجة نظام إدارة القوالب و الستايلات ب xml
-
 مرحبا حسام، ستجد أسفل الفيديو الخاص بالدورة مكان مخصص بالتعليقاتن هناك، أرجوا وضع سؤالك أسفل فيديو الدورة.
 -
https://scratch.mit.Untitled-8 copy copy.sb3edu/projects/1011389316/editor/ حاولت حل مشاكل برمجية في نسختي الخاصة وفشلت 😥 أرجو المساعدة 👆 المشاكل هيا : 1- عدم إختفاء نماذج الأرواح داخل اللعبة (والمتواجدة في زوايا خريطة اللعبة). 2- خروج الدبابة من ساحة اللعب عند ملامستها لحدود الخريطة.
- 1 جواب
-
- 1
-
-
Task A class Player is a class that holds the info of a football player including the following private member variables: 1- Name (string) 2- Year of Birth (int) 3- Height (int) 4- International Goals (int) 5- Nationality Add appropriate setters and getters for the class. The class NationalTeam is a class holding the players in a national football team of a certain country. The class has an array of Player objects [players] of size 18, holding all the players including substitutes (fixed size). The class has another array of Booleans [active] of size 18, where an element at index i in the active array is true if there’s a player in the players array at index i, and false otherwise. Both arrays are private members of the class. Other members of the class include country. The array of players is initially empty, and the active array’s elements are set to false. We can add to the array using the addPlayer(const Player&) member function, which will add the parameter player object in the first empty slot in the players array. The function will also update the active array to indicate that a player is added at that index. The function returns true if the player was added, false otherwise. We can also remove players using removePlayer(string) from the players array by giving the player’s name and the player will be removed (the player object will not actually be removed but, the active array will be updated to indicate this). Make sure that the name entered is not case sensitive. The function will return true if the player was found and removed, false otherwise. There other public member functions in the class including: - getNumOfPlayers // to return total number of players in the team - AvgHeight() // to return the average height of the team players - OldestPlayer() // to return the oldest player object - YoungestPlayer() // to return the youngest player object - AvgIntGoals() // to return the average number of international goals per player in the team - highestIntGoals() // to return the player with the highest number of international goals - operator<< // to output a team’s country and its players info. - writeStatistics(oftream&) // writes team statistics to a file including: o Team Country o Number of players o Average height of players o Name and age of oldest player o Name and age of youngest player o Average number of international goals of players o Name of the player with the highest international goals and the number of goals scored by this player. — For example: Country: # of Players: Avg. Height: Oldest Player: Age: Youngest Player: Age: Avg. Int. Goals: Player with highest goals: Gools: Create a global function readPlayersFromFile(ifstream&) which reads all players info from a file named “players.txt” into an array of player objects. Note that this file will have all of the players of all the teams that will be added later. The file will have the number of players in the file at the first line of the file. An example file is shown —For exampl : 100 Mohamed Salah 1992 173 48 Egyptian //////same for the rest of players until player 100///// Finally, create a main that will: 1- read players from players.txt into an array of player objects. 2- Ask the user to enter a number of national teams where the user will just enter their country names. 3- Next Display the players read from the file and the national teams entered by the user. 4- Now in a loop: Ask the user to add/remove players to teams as many times as they wish You can display players and teams numbered in step 3 such that the user can choose to add a player to a team by their displayed numbers. To remove a player the user has to enter their name to be removed. 5- After finishing step 4, show all of the national teams added by the user including the country and the players in this team using the operator<<. 6- Finally write the statistics of each of the teams to the file statistics.txt. All teams statistics should be in this single file. Writing Good Quality Code No program stays the same. It will need to change to fix bugs, add new features, etc. So, it is very important to write high quality readable code, so that you or other developers can be able to review and modify this code in the future. In this task, you will: 1. Add a comment/header at the beginning of your program saying who the author is, the purpose of the program, etc. 2. Add a comment/header for every function explaining what it does, what parameters it takes and what value it returns. 3. Add comments to any part that is difficult to understand.
-
ظهر هذا الخطا
-
قم باستبدال الدالتين handleSubmit و handleImageChange ولا اعرف لماذا تقوم برفع الصورة مرتين حاول فقط رفعها مرة واحده باستخدام api واحد فقط const handleImageChange = (e) => { const file = e.target.files[0]; setimage(file); }; const handleSubmit = async (e) => { e.preventDefault() try { const formData = new FormData(); formData.append('name',name); formData.append('pathname',pathname); formData.append('image',image); await axios.post('https://api.wesamelnagah.com/api/maincategory', formData,{ headers: { "Content-Type": "multipart/form-data", }, }) await axios.post('https://api.wesamelnagah.com/api/uplode',formData, { headers: { "Content-Type": "multipart/form-data", }, }) setname('') setimage(null) setpath('') } catch (error) { console.log(error) } } والان من المفترض ان يتم حفظ الصورة على الخادم وفى قاعدة البيانات بشكل صحيح
- 12 اجابة
-
- 1
-
-
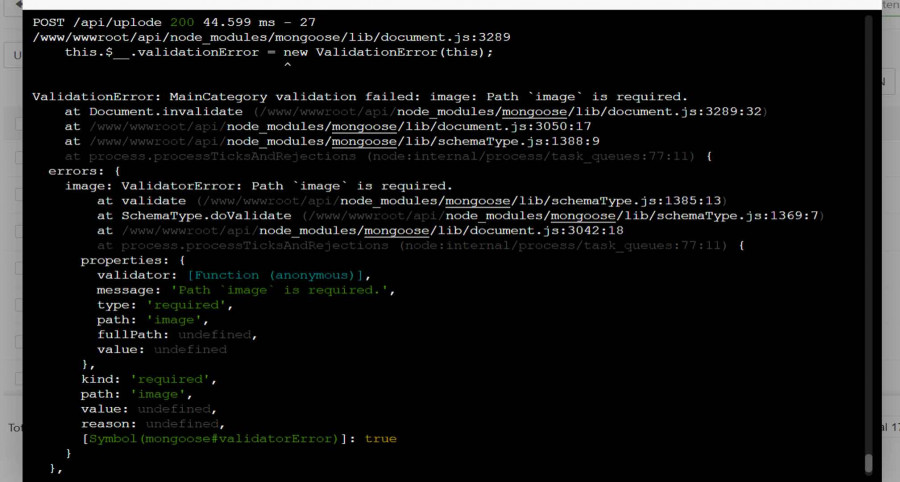
اولا الصورة لا تظهر في مسار ثانيا :بيانات الصورة في مونجو تظهر هكذا { "_id": { "$oid": "663130bf7ae7f1e84fa6e37e" }, "name": "سيبلسيبل", "pathname": "بليسبليبل", "title": "سيبلسيبل", "desc": [ "" ], "image": "[object FormData]", "createdAt": { "$date": "2024-04-30T17:56:15.554Z" }, "updatedAt": { "$date": "2024-04-30T17:56:15.554Z" }, "__v": 0 }
- 12 اجابة
-
- 1
-
-
الخطأ هنا لديك فى كود الواجهة الامامية . قم باسبتدال الكود السابق بهذا الكود . const formData = new FormData(); formData.append('name',name); formData.append('pathname',pathname); formData.append('image',image); await axios.post('https://api.wesamelnagah.com/api/maincategory', formData,{ headers: { "Content-Type": "multipart/form-data", }, }) وتاكد من انه يتم رفع الصورة بشكل صحيح ثم اعد كتابة السطر الذى حذفته فى الخادم
-
هذا كود العميل الذي يقوم بارسال البيانات الى الخادم import React, { useEffect, useState } from 'react' import { AppFooter, AppHeader, AppSidebar, DocsExample } from '../../../components' import axios from 'axios' import { CButton, CForm, CFormInput, CFormLabel, CFormTextarea } from '@coreui/react' export default function programs() { const [name, setname] = useState('') const [image, setimage] = useState(null) const [pathname, setpath] = useState('') const [title, settitle] = useState() const handleImageChange = (e) => { const file = e.target.files[0]; const formData = new FormData(); formData.append("image", file); setimage(formData); }; const config = { headers: { "Content-Type": "multipart/form-data", }, }; const handleSubmit = async (e) => { e.preventDefault() try { await axios.post('https://api.wesamelnagah.com/api/maincategory', { name, pathname, image, // title }, config ) await axios.post('https://api.wesamelnagah.com/api/uplode',image, { headers: { "Content-Type": "multipart/form-data", }, }) setname('') setimage(null) setpath('') } catch (error) { console.log(error) } } return ( <div className="programs_container"> <AppSidebar /> <div className="wrapper d-flex flex-column min-vh-100"> <AppHeader /> <div className="body flex-grow-1"> <CForm onSubmit={handleSubmit}> <div className="mb-3"> <CFormLabel htmlFor="exampleFormControlInput1"> عنوان الباقة</CFormLabel> <CFormInput type="text" id="exampleFormControlInput1" onChange={(e) => setname(e.target.value)} /> <CFormLabel htmlFor="exampleFormControlInput1"> مسار الباقة</CFormLabel> <CFormInput type="text" id="exampleFormControlInput1" onChange={(e) => setpath(e.target.value)} /> </div> <div className="mb-3"> <CFormLabel htmlFor="formFile">صورة الباقة</CFormLabel> <CFormInput type="file" id="formFile" onChange={handleImageChange} /> </div> <div className="d-grid gap-2 col-6 mx-auto"> <CButton color="primary" type="submit"> Submit </CButton> </div> </CForm> </div> <AppFooter /> </div> </div> ) } الصورة التي ترسل الى uplode تصل الى المسار الخاص بها اما التي ترسل الى /maincategory لا يصل الى public/images/
- 12 اجابة
-
- 1
-
-
قم بارجاع السطر السابق كما كان سابقا هكذا. const programmes = MainCategory({name,pathname,title, image, desc}); وقم بمحاولة رفع الصورة واخبرنى هل يتم رفعها الى الخادم ام لا فى مسار public/images/ فاذا لم يتم رفعها الى الخادم فيبدو انه توجد مشكلة لديك فى الخادم .
- 12 اجابة
-
- 1
-
-
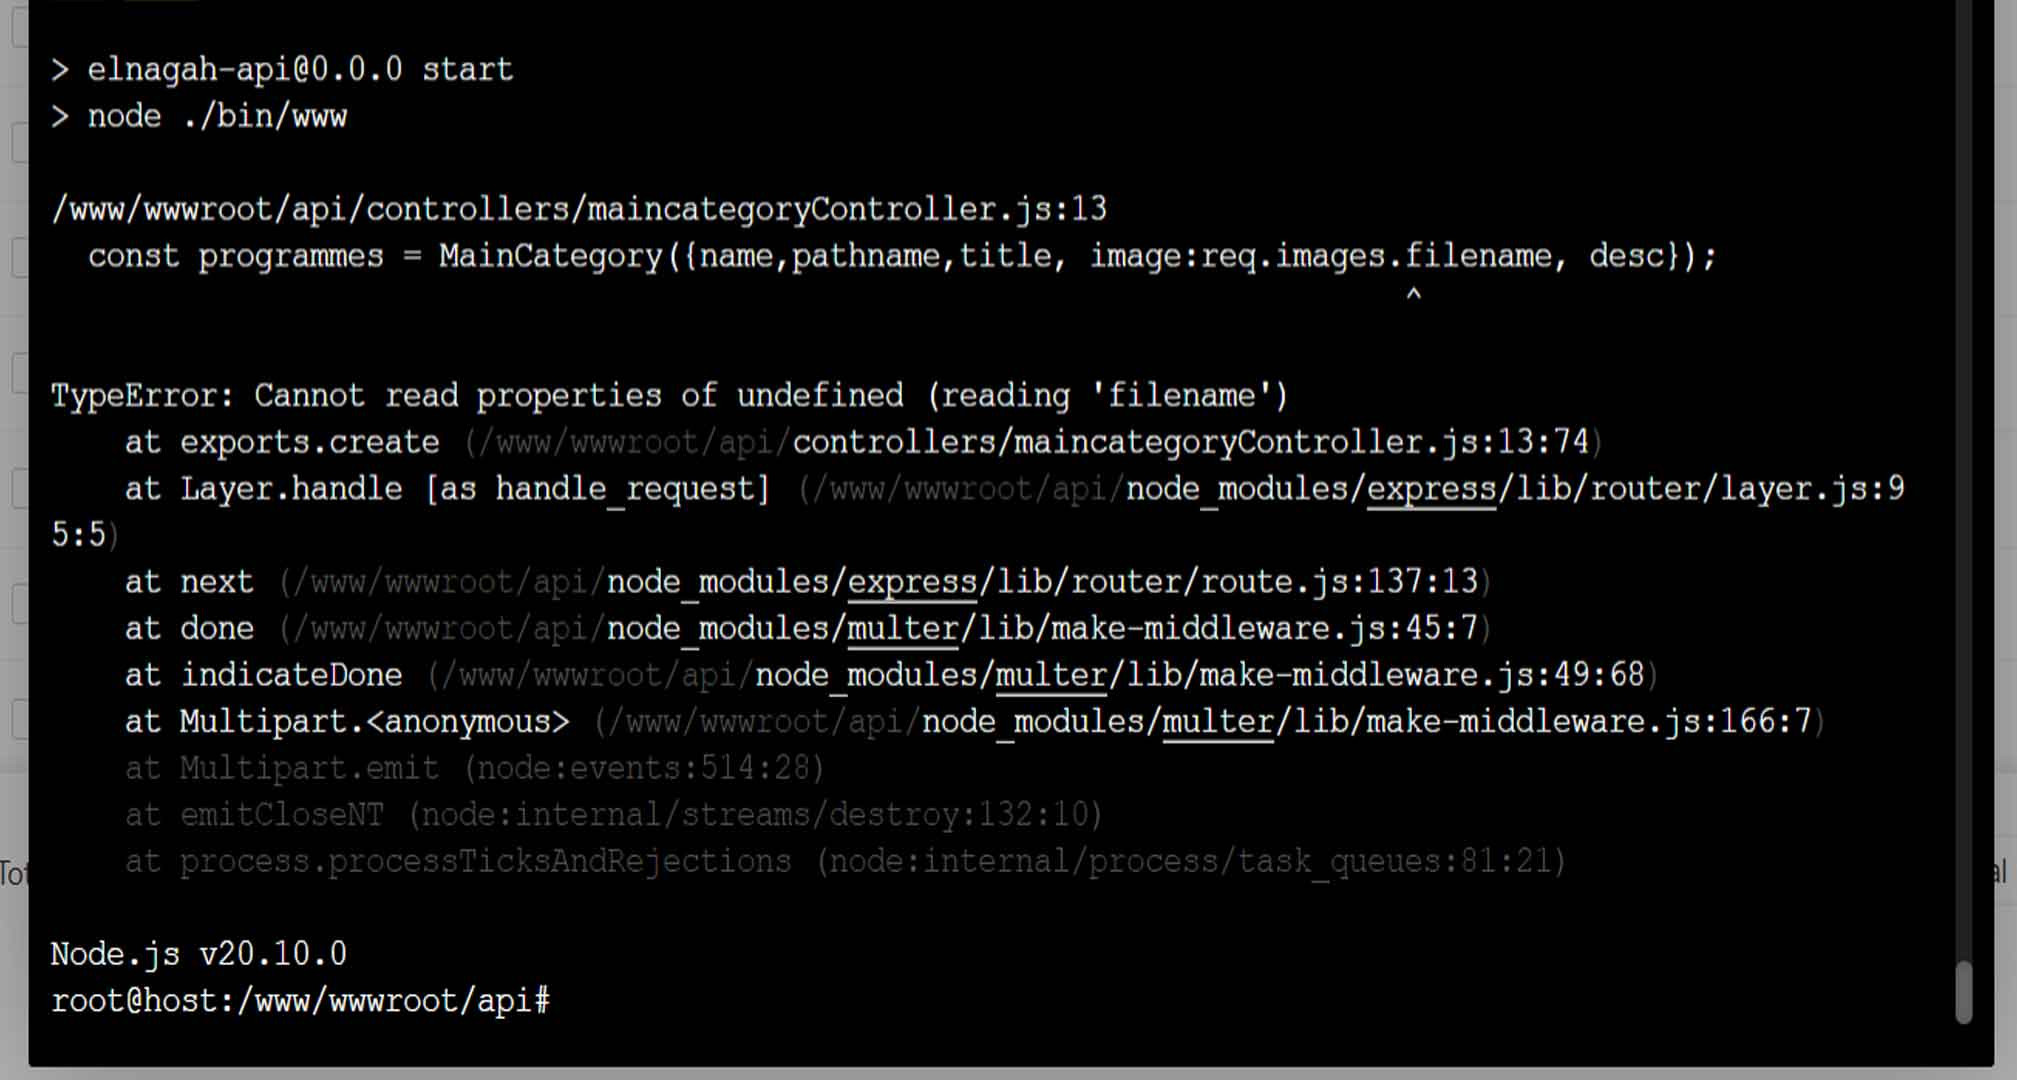
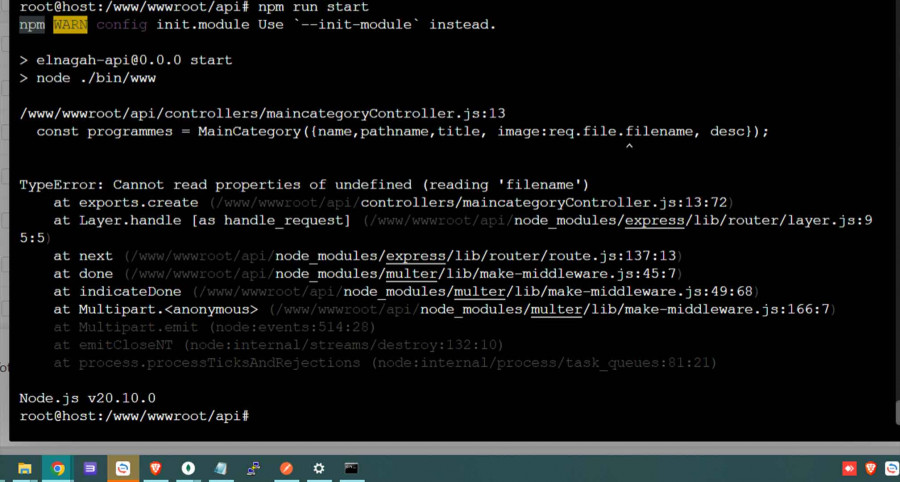
في الخطا الاول كان هذا هو المكتوب وايضا نتج الخطا والصورة لا ترسل الى الخادم ويتوقف الخادم عن العمل
-
هذا السطر خطأ يجب ان يكون image:req.file.filename هكذا كما اخبرتك . قم بالذهاب الى public/images/ لديك على الخادم وتاكد من انه تم رفع الصورة بنجاح فاذا لم يتم رفع الصورة فان الكود السابق لن يعمل ويبدو انه يوجد خطأ يمنع رفع الصور مثل عدم وجود المسار السابق او خطأ اخر . لذلك المهم الان هو التاكد من ان الصورة يتم رفعها بشكل صحيح ام لا على الخادم
- 12 اجابة
-
- 1
-
-
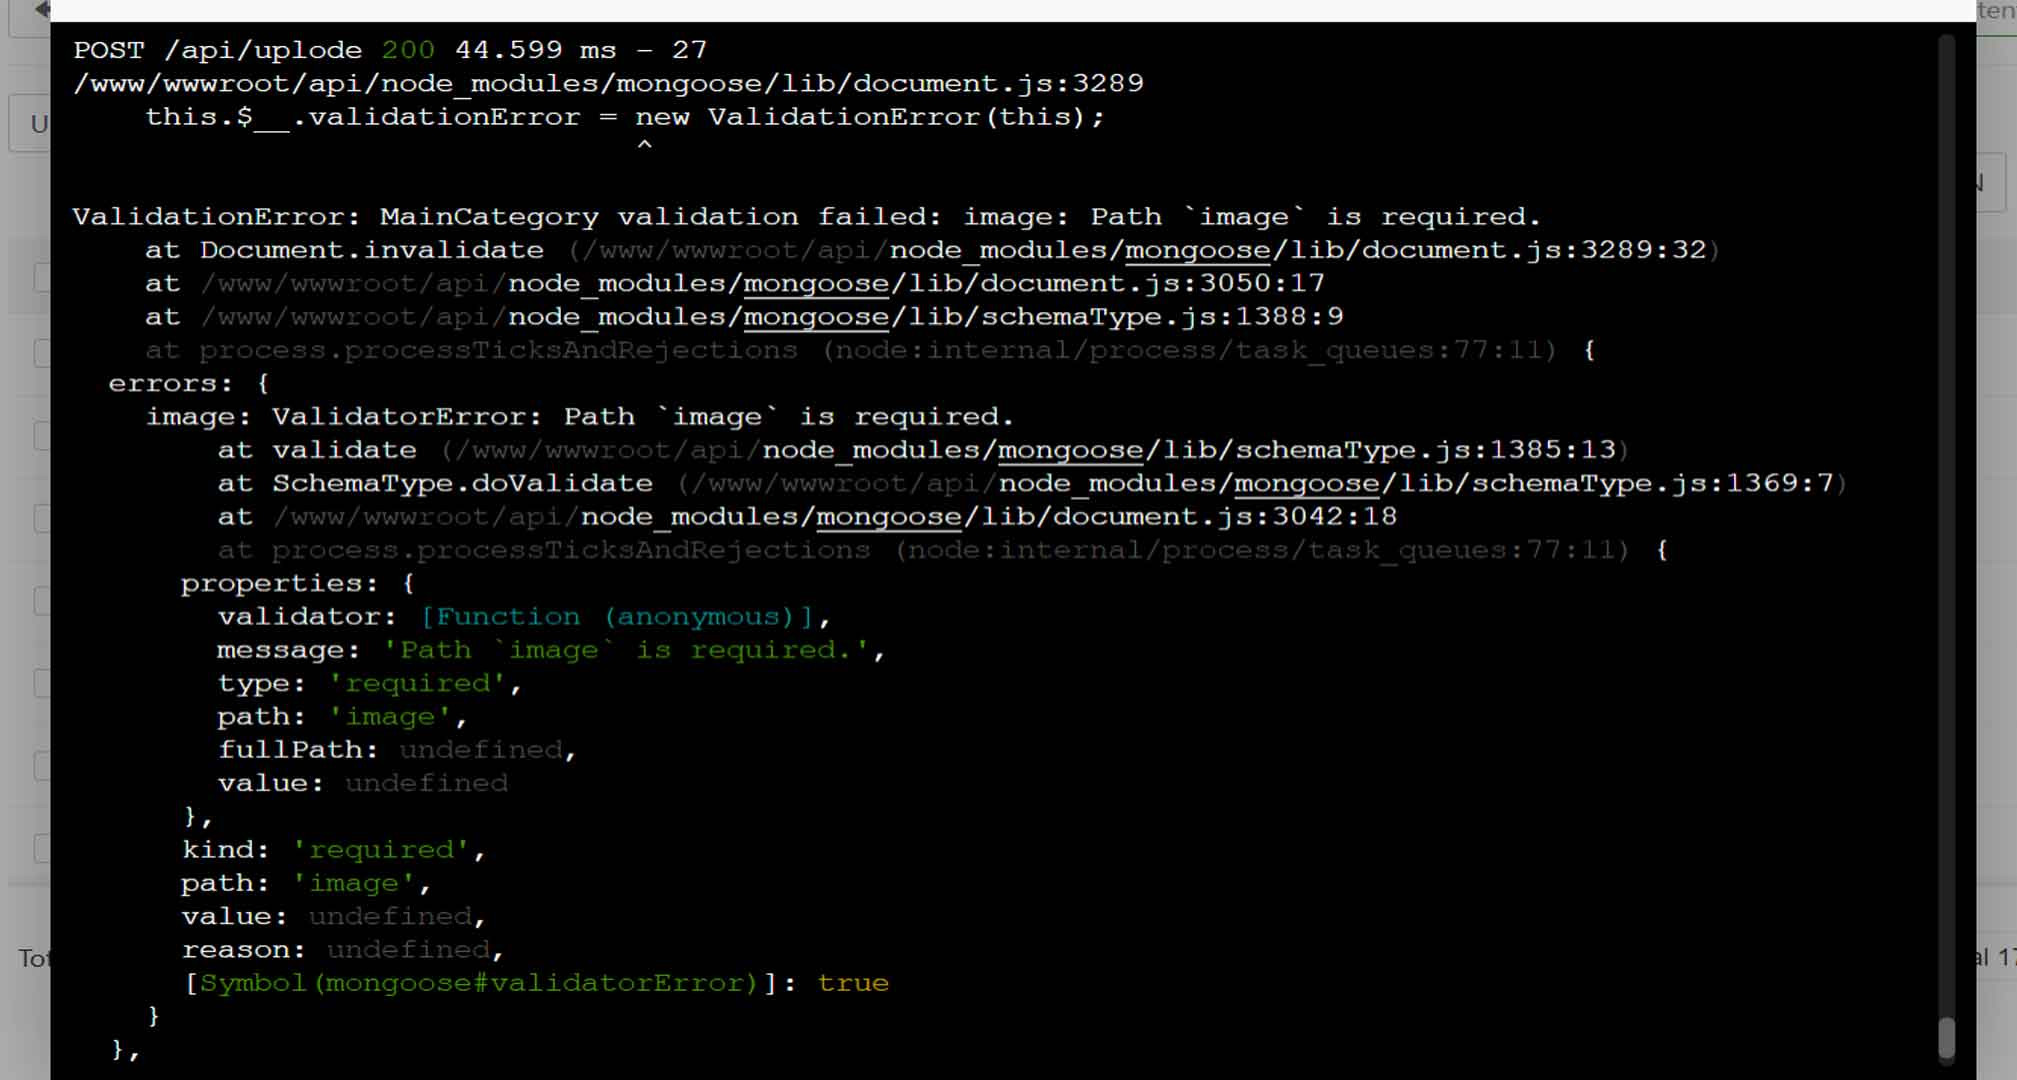
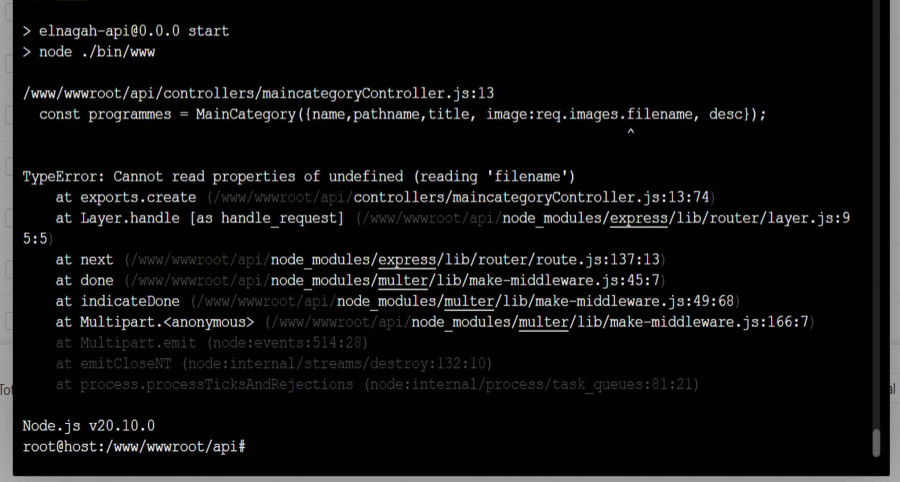
هذا كود ruote /** * Module dependencies. */ const express = require('express'); /** * Express router. */ const router = express.Router(); /** * Path Module. */ const path = require('path'); /** * Multer Module. */ const multer = require('multer'); /** * Handel multipart/form-data. */ const storage = multer.diskStorage({ destination: 'public/images/', filename: function (req, file, cb) { cb(null, Date.now() + path.extname(file.originalname)) } }); /** * User profile middleware. */ const upload = multer({ limits: { fileSize: 1024 * 1024 }, storage: storage , fileFilter: (req, file, cb) => { let fileTypes = /jpeg|jpg|png/; let mimeType = fileTypes.test(file.mimetype); let extname = fileTypes.test(path.extname(file.originalname).toLowerCase()); if (mimeType && extname) return cb(null, true); cb(new Error('غبر مسموح رفع هذا الملف')); }, }); const controller = require('../controllers/maincategoryController') /** * Auth middleware. */ const auth = require('../middlewares/auth') /** * Admin middleware. */ const admin = require('../middlewares/admin') /** * Routes. */ router.post('/',upload.single('image'), controller.create) router.put('/:id', controller.update) router.delete('/:id', controller.delete) router.get('/', controller.list) router.get('/:id', controller.find) module.exports = router; وهذا كود controller const programmes = MainCategory({name,pathname,title, image:req.images.filename, desc}); هل هذه الطريقة صحيحه ام اين الخطا فيها لانها تظهر هذا الخطا
-
هل تم رفع الصورة فى المسار الصحيح ؟ حيث ان المكتبة multer بعد الرفع تقوم بوضع بيانات الصورة فى req.file . وهذا الخطأ يخبرك بانه لا يوجد req.file لذلك يبدو انه لا يتم رفع الصورة .
- 12 اجابة
-
- 1
-
-
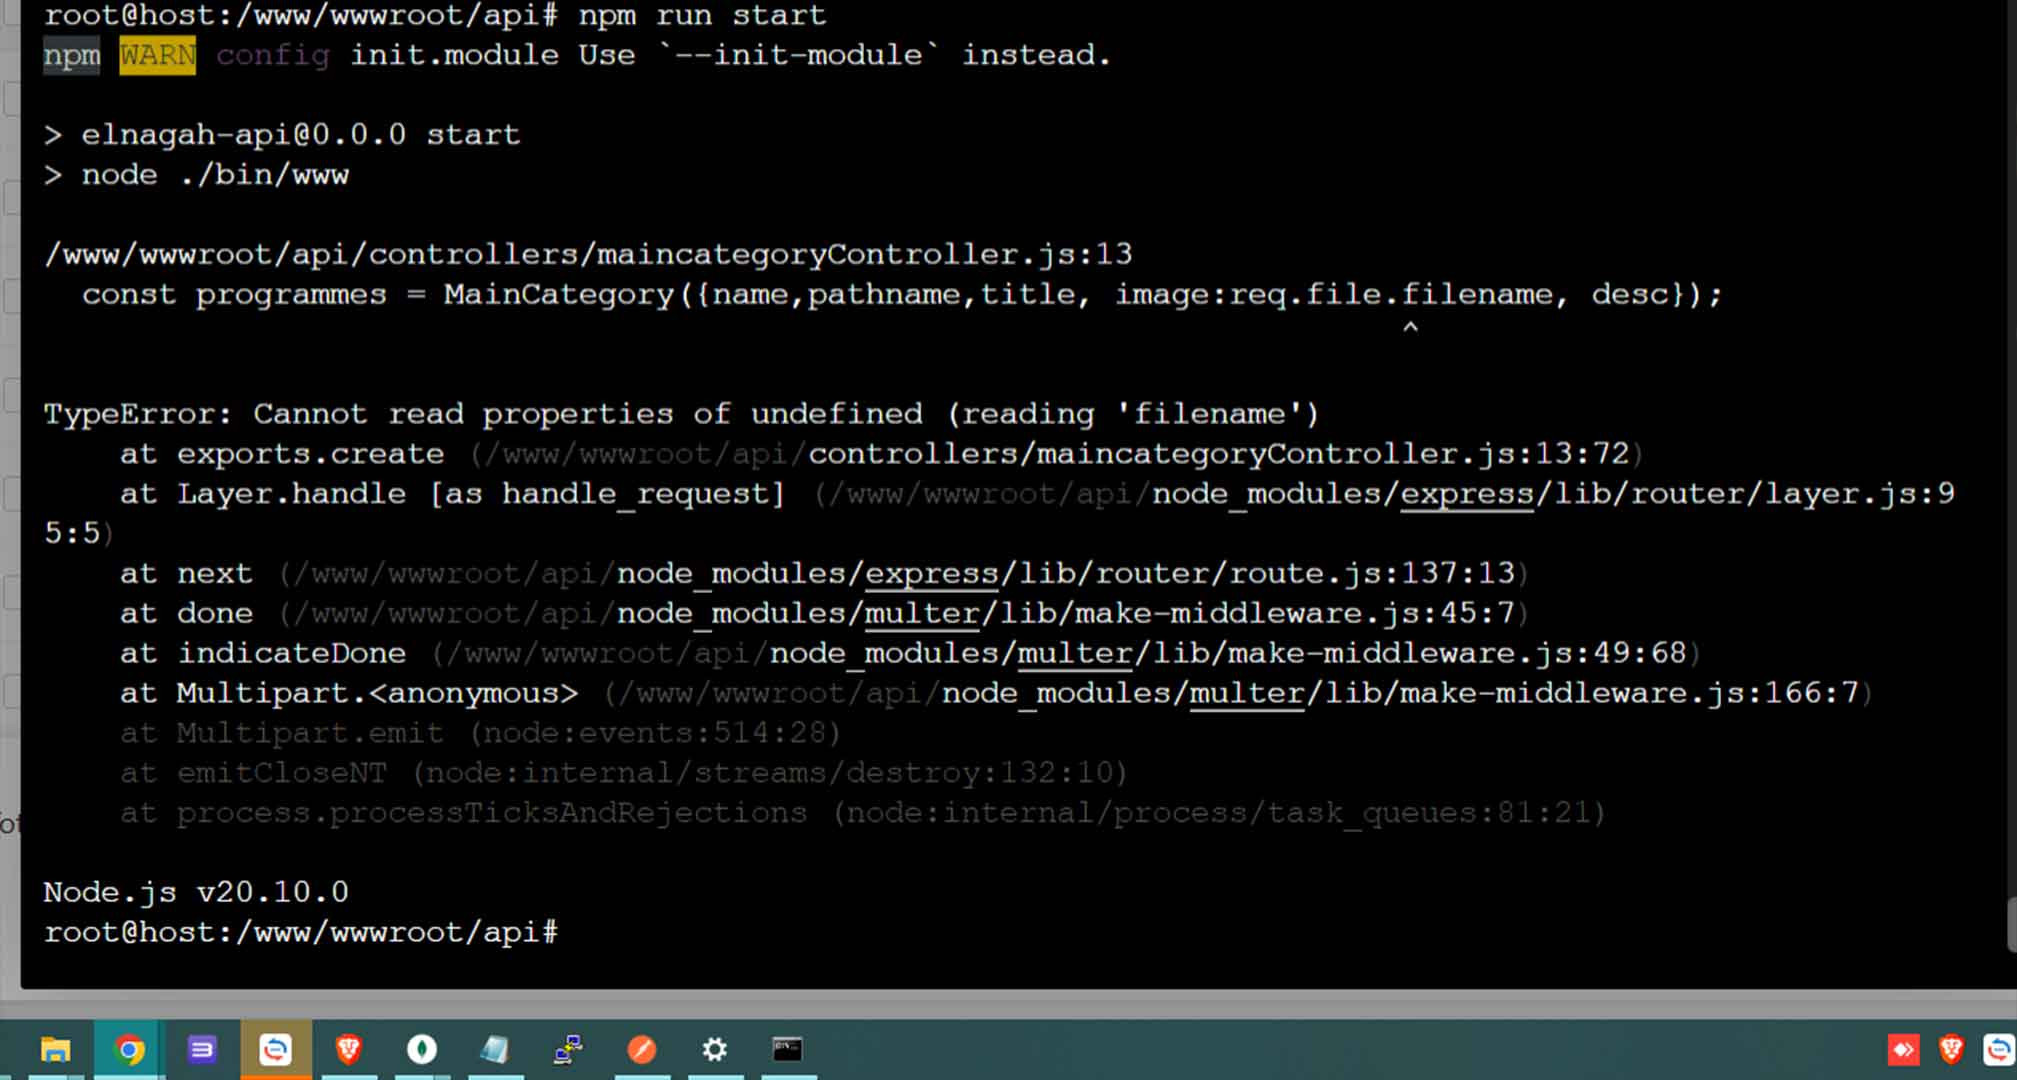
يظهر لي هذا الخطا
- 12 اجابة
-
- 1
-
-
لاحظ انك فى ملف maincategoryController.js فى الدالة create حين انشاء النموذج فانت تقوم بارسال المتغير image وهو المتغير الذى يحمل الصورة وهذا خطأ حيث انك تريد حفظ مسار الصورة . ولذلك الحل هو استبدال سطر رقم 13 بالسطر التالى . const programmes = MainCategory({name,pathname,title, image:req.file.filename, desc}); حيث ان ال req.file.filename تقوم بارجاع اسم الصور الذى تم حفظه على الخادم . والان قم بتنفيذ الكود والتاكد من انه تم رفع الصورة جيدا على الخادم ومن ثم تاكد بان اسم الصورة تم حفظه فى قاعدة البيانات بشكل صحيح .
- 12 اجابة
-
- 1
-
-
كيف تصنع الفيروسات وبأي لغة ..
-
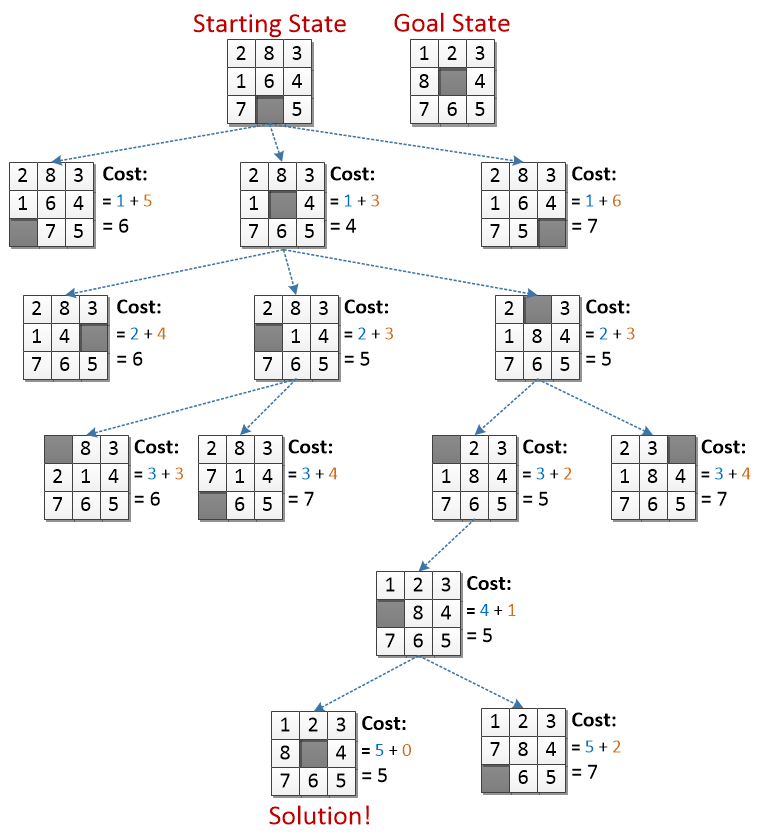
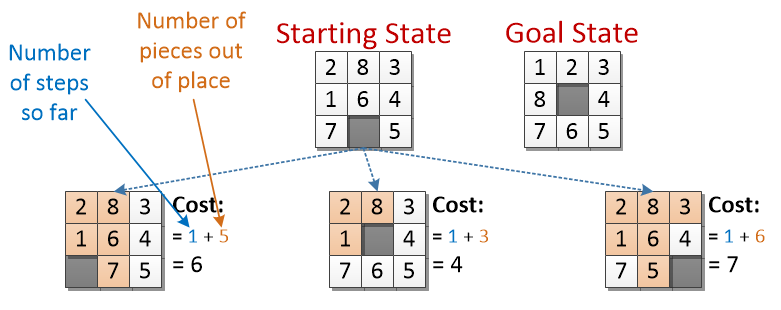
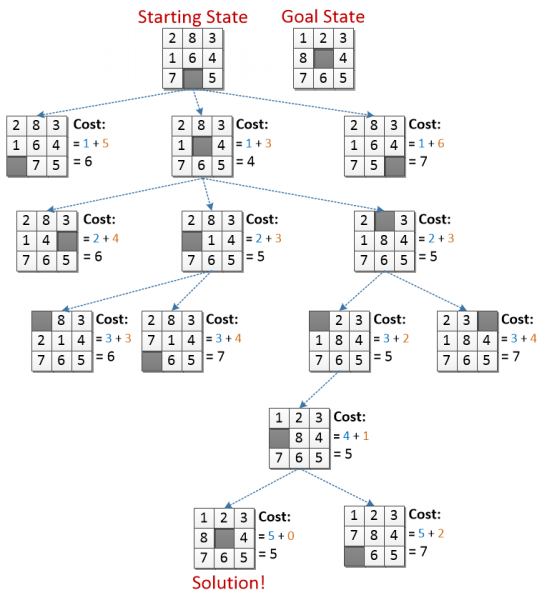
التجريبية(heuristic) هي عبارة عن قواعد تضاف الى الخوارزميات العادية لتضيف بعض التوجيه للحل وتكون الخوارزمية اكثر ذكاء مثال 1: مسألة الوزراء الثمانية: تتمثل في وضع ثماني وزراء على رقعة شطرنج ثُمانيَّة 8 × 8، بحيثُ لا يهدد وزيران بعضيهما، وبذلك يكون الحل ألا يتشارك وزيران في نفس الصف، أو العمود أو القطر الواحد الحل المعتاد : backtrack algorithm وهي خوارزمية غبية تقوم بتجريب كل الحالات حتى الوصول للحل . الحل باستخدام التجريبية (heuristic) :بحيث نضيف شرط ان يدخل للحالات صاحبة اقل رقم للتجريبية حيث يمكن ونضع كل وزير على الرقعة بحيث يكون عدد المربعات التي يهددها أقل ما يمكن . تمثل رياضيا بان نعطي عقوبة بمقدار 1 على كل مربع يهدده الوزير وتصبح نضع الوزير في المكان الذي يحقق اقل عقوبة الناتجة عن التجريبية. مثال 2: 8-puzzel ترتيب الارقام في الرقة بالشكل الصحيح بحيث يسمح لك الانتقال في كل مرة تحريك رقم حتى الوصول للهدف اذا اعطت هذه المسالة الى الحاسوب لن يكون قادر على رؤية منهجية افضل للوصول للحل كما يراها الانسان الحقيقي فهو يقوم بتجريب جميع التحركات حتى يصل للحل ولمساعدته تم اقتراح مفهوم ال(heuristic) التي تعطيه توجيه للوصول للحل بشكل اسرع الحل التجريبي (heuristic) لهذه اللعبة : يوجد تجريبيتان , واحدة أفضل من الأخرى : عدد القطع التي لا تزال في غير مكانها مقارنة بالهدف. (ما عدا الفراغ). ولحساب التكلفة نضيف واحد عند كل حركة وذلك لحل مشكلة تساوي رقعتين اي تم الوصول للرقعتين بطريقتين مختلفتين واحدة بعدد انتقالات اقل او اكثر من الاخرى. في حالة البداية يمكن تحريك اما 7 او 6 لو 5 ونحسب تكلفة كل حالة حسب الاستراتيجية التي وضعناها وناخذ الاقل تكلفة نكرر العمليات حتى نصل الى الحالة الهدف ويوجد خوارزميات بجث شهيرة كخورازية البحث بالعرض (BFS) التي تقوم بتمثيل الحل على شكل شجرة وتنتقل من مستوى الى اخر حيث تقوم بتجريب جميع الحالات للوصول للحل المطلوب لذلك تعتبر من الخوارزميات الغبية ايضا حيث عدلت على هذه الخورمية واضيف لها (Heuristic) خاص بالمسالة ليصبح اسمها خوارمية (A*) لتقوم بالدخول بالطريق صاحب اقل تكلفة بدل تجربة كل الطرق.


-
بداية، في مجال الصور الحاسوبية، هناك نوعان من الصور: الصور النقطية (bitmap images) والرسومات المتجهية (vector graphics). الصور النقطية هي الصور التي يتم تمثيلها عن طريق تحديد لون كل بكسل. هذه هي أغلب أنواع الصور وأكثرها شهرة، لأنّها الصور التي تنتجها آلات التصوير والماسحات الضوئية وغيرها من أجهزة التقاط الصور. من أكثر صيغ الصور النقطية شهرة نجد JPEG، PNG، و GIF. أمّا الرسومات المتجهية، فهي رسوم يتم تعريفها عن طريق وضع نقاط على المستوى وتحديد الخطوط بينها كدوال رياضية. ميزة هذه الرسومات أنّها أصغر بكثير من ناحية الحجم، وأنّه يمكن تكبيرها إلى ما لانهاية بدون خسارة جودتها (نعم أقصد ذلك حرفيا، يمكن تكبيرها إلى ما لانهاية!). الرسوم المتجهية رائعة في كل شيء باستثناء شيء واحد وهو الشيء الذي يعيق استخدامها: أنّه يجب رسمها يدويا ولا يمكن توليدها من أجهزة الحصول على الصور مثل الصور النقطية. أشهر صيغة من صيغ الرسوم المتجهية هي SVG. لذلك، فالرسوم المتجهية تجدها مستخدمة دائما في الأيقونات والخطوط والشعارات. أمّا الصور النقطية فتستخدم للصور الفوتوغرافية عموما، التي يتم الحصول عليها عن طريق أحد أجهزة التقاط الصور، وكذلك الصور المعدّلة بعد الالتقاط. والآن بعد أن فهمنا الفرق بين الرسوم المتجهية والصور النقطية، حان الوقت للعودة إلى HTML. إذا كانت لديك صورة نقطية، فالطريقة الصحيحة لإدخالها في صفحة ويب هي باستخدام الوسم <img>. إذا كانت لديك رسمة متجهية بصيغة SVG، فلديك عدّة خيارات: إما أن تستخدم الوسم <img> في الملفات البسيطة، لكن يفترض تجنّب هذه الطريقة لأنّها ليست الطريقة الصحيحة لفعل ذلك. أو استخدام الوسم <object> لتضمينها: <object data="image.svg" type="image/svg+xml"></object> أو تضمين محتوى الصورة مباشرة داخل HTML عن طريق الوسم <svg>. هذا الأمر ممكن لأن صيغة SVG ما هي في الواقع إلا ملف XML، يمكنك نسخ محتواه ووضعه داخل HTML بدون مشاكل: <svg width="100" height="100"> <rect x="10" y="10" width="80" height="80" fill="blue" /> <!-- محتوى SVG --> </svg> حسنا ماذا عن <canvas>؟ هذا الوسم يعطيك مساحة فارغة يمكنك الرسم فيها باستخدام JavaScript. يعني أنّه طريقة أخرى لرسم الرسومات المتجهية، لكن بدل إحضار رسم جاهز وتضمينه، يسمح لك هذا الوسم بالرسم مباشرة على الصفحة.
-
ستجد أسفل فيديو الدرس في نهاية الصفحة صندوق تعليقات كما هنا، أرجو طرح الأسئلة أسفل الدرس وليس هنا في قسم الأسئلة البرمجة حيث نطرح الأسئلة العامة الغير متعلقة بمحتوى الدورة أو الدرس وذلك لمساعدتك بشكل أفضل.