كل الأنشطة
- الساعة الماضية
-
 يحيى محمد اشترك بالأكاديمية
 -
 Eslam Solam اشترك بالأكاديمية
 -
 Moaaz Kamel اشترك بالأكاديمية
 -
 Nessma Rafat اشترك بالأكاديمية
 -
 Ahmed Alkhwalde اشترك بالأكاديمية
 -
 Mohamed Elsawah اشترك بالأكاديمية
 -
لو سمحت انا كل ما اذاكر فديو وادخل البعديه احس اني نسيت لو في طريقه اذاكر بيها دوره البرمجه لاني اول مره اذاكر برمجه خصوصا اني مهندس مدني ومالي علاقه بس عايز استخدمها في مجالي افيدونا في طريقه اذاكر بيها البرمجه ولا اضيع فيها وقت كبير وشكرا
-
 محمد مصطفى35 اشترك بالأكاديمية
 - اليوم
-
 نور الدين محمد3 اشترك بالأكاديمية
 -
إطار العمل Django هو إطار عمل Python متكامل ويوفر الكثير من الميزات المدمجة مثل ORM (Object-Relational Mapping)، وإدارة الجلسات، والأمان، والإدارة الإدارية، بينما Express.js هو إطار عمل خفيف ومرن يعمل على Node.js، مما يجعله مثاليا لتطوير تطبيقات الويب السريعة والمرنة. فإذا كنت تفضل استخدام Python وتحتاج إلى بنية متكاملة مع مجموعة واسعة من الميزات المدمجة، فإن Django يبقى خيارا لك، أما إذا كنت ترغب في المرونة والقدرة على بناء تطبيقات الويب بسرعة باستخدام JavaScript، فإن Express.js/Node.js مناسبان جدا. ويبقى الاختيار بينهما على حسب احتياجاتك واحتياجات مشروعك ومهاراتك. فإكسبريس ودجانغو هما إطاري عمل قويان ويقدم كل منهما قوة فريدة ويلبيان متطلبات مشاريع مختلفة على حسب تفضيلات المطورين.
-
 بيرم بيرم اشترك بالأكاديمية
 -
 Youssef Hegazy Hegazy اشترك بالأكاديمية
 -
في دورة الذكاء الإصطناعي، المسار الأول مخصص لتعلّم لغة Python، لأنّها اللغة التي سيتم العمل بها في كامل الدورة. لذلك، هل درستي هذا المسار قبل الدخول إلى مواضيع الذكاء الاصطناعي؟ هل تعلمتي لغة Python قبل هذه الدورة أم أنت تتعلمينها خلال الدورة؟ إذا لم تكوني تعلمتي هذه اللغة من قبل فالمسار الأوّل ضروري ولا يمكن تجاوزه. ففي دورة الذكاء الاصطناعي هنا، تقوم أكاديمية حسوب بتخريج مهندسين في الذكاء الاصطناعي، وهؤلاء يجب أن يكون لديهم معرفة جيدة جدا في البرمجة. فليس المقصود تعليم الشخص كيف يتعامل مع ChatGPT أو Midjourney أو غيرها من الأدوات التي يستخدمها عموم الناس، بل المطلوب هو أن يستطيع المتعلّم فهم ما يجري خلف الكواليس ويساهم في استخدام تقنيات الذكاء الاصطناعي لبناء تطبيقات حقيقية. لذلك تعلّم البرمجة بلغة Python ضروري قبل كل شيء. بعد تعلّم لغة Python، ينتقل الطالب بعدها إلى تعلّم كيفية التعامل مع البيانات أيّا كان مصدرها. وهذا أيضا شيء ضروري جدا، فلا يوجد ذكاء اصطناعي بدون بيانات. لذلك، ينبغي أن يكون الطالب متمكنا من التعامل مع البيانات استخراجا وحفظا ومعالجة قبل أن يبدأ أوّل برنامج له بالذكاء الاصطناعي. بعد ذلك، يمكن الدخول في أمور الذكاء الاصطناعي انطلاقا من المسار الثالث وما بعده. أتمنى أن يكون هذا توضيحا لك للانطلاق في الدورة. أمّا إذا كنت تريدين التعرف على المجال بشكل عام ونظري قبل البدأ في العمل فسوف تجدين تفاصيلا في مقالات أكاديمية حسوب، ومنها:
-
ربط ملف إكسل ليس بالأمر الصعب، بحيث يمكن عرض البيانات وتعديلها من خلال واجهة ويب وتتحديث ملف Excel تلقائيا، وهذا من خلال استخدام مكتبة SheetJS، والتي تتيح لك قراءة وكتابة ملفات Excel باستخدام JavaScript، وهذا مثال بسيط يوضح كيفية استخدام المكتبة لقراءة ملف Excel و التعديل عليه: // تحميل مكتبة SheetJS const XLSX = require('xlsx'); // تحميل ملف Excel const fileInput = document.getElementById('fileInput'); fileInput.addEventListener('change', function(event) { const file = event.target.files[0]; const reader = new FileReader(); reader.onload = function(event) { const data = event.target.result; const workbook = XLSX.read(data, {type: 'binary'}); // قراءة البيانات من ورقة العمل const worksheet = workbook.Sheets[workbook.SheetNames[0]]; const jsonData = XLSX.utils.sheet_to_json(worksheet); // عرض البيانات في صفحة الويب console.log(jsonData); }; reader.readAsBinaryString(file); }); يمكنك دمج هذا الكود مع وظائف إضافية لعرض وتعديل البيانات وحفظها مرة أخرى إلى ملف Excel.
-
 نعم، يمكننا استخدام JavaScript لقراءة ملف Excel أو ملفات ال CSV من صفحة الويب وعرض البيانات على الصفحة أو تحريرها ومن ثم حفظ التغييرات مرة أخرى في الملف، هذا مثال على ذلك: <!DOCTYPE html> <html lang="en"> <head> <meta charset="UTF-8"> <meta name="viewport" content="width=device-width, initial-scale=1.0"> <title>CSV Reader</title> </head> <body> <input type="file" id="csvFileInput"> <table id="csvTable"></table> <script> document.getElementById('csvFileInput').addEventListener('change', function() { var file = this.files[0]; var reader = new FileReader(); reader.onload = function(event) { var csvData = event.target.result; var table = document.getElementById('csvTable'); var rows = csvData.split('\n'); table.innerHTML = ''; // Clear existing table data rows.forEach(function(row) { var columns = row.split(','); var tr = document.createElement('tr'); columns.forEach(function(column) { var td = document.createElement('td'); td.textContent = column; tr.appendChild(td); }); table.appendChild(tr); }); }; reader.readAsText(file); }); </script> </body> </html> فهذه الشيفرة تتيح للمستخدم تحديد ملف CSV من خلال عنصر الإدخال <input type="file"> ثم يقوم بقراءة محتويات الملف وعرضها في جدول على الصفحة، لكن يمكنك تعديل هذا الكود ليتناسب مع ملف Excel بطريقة مشابهة، ولكن سيتطلب ذلك استخدام مكتبة JavaScript أخرى مثل SheetJS وهذا مكتبة sheetjs ومنها ستتمكن قراءة ملفات Excel بصيغة .xlsx.
 -
هل فيه كود يربط ملف الاكسل مع صفحة الويب عن طريق JS واقدر ابحث واعدل من خلالها وتتعدل تلقائياً في الاكسل ؟
- 2 اجابة
-
- 2
-

-
وعليكم السلام ورحمة الله وبركاته . لا يمكن قول أن إطار العمل django أقوى او أفضل من express.js بشكل عام، لأن لكل منهما ميزاته واستخداماته الخاصة. إطار العمل django مكتوب بلغة python ومصمم لتطوير تطبيقات الويب الشاملة بشكل سريع وفعال، مع توفير الكثير من الميزات المدمجة مثل نظام إدارة قواعد البيانات ونظام التحقق من الهوية والتوثيق. اما express.js هو إطار عمل لغة جافاسكريبت يعمل على بيئة تطوير node.js ويسمح ببناء تطبيقات الويب والخوادم بسهولة باستخدام جافاسكريبت على جانب الخادم. يتميز express.js بمرونة كبيرة وبساطة في الاستخدام، مما يجعله شائعًا لتطوير تطبيقات الويب الخفيفة والمتوسطة الحجم. ان اطار عمل django ياتى مدمجا بكثير من المميزات والخصائص مثل نظام إدارة قواعد البيانات ORM ونظام إدارة المستخدمين والتوثيق ونظام الإدارة الإدارية للموقع ويوفر الامان والحماية ضد هجمات XSS وCSRF و SQL injection. اما express.js مرن ويسمح للمطورين ببناء تطبيقات مختلفة بسهولة وسرعة حيث يتمتع بقدرته على التوسع بسهولة لمعالجة أعباء عالية من خلال نموذج غير تقليدي للمدخلات والمخرجات (non-blocking I/O) حيث لا يقوم بحجز الموارد لاشخاص فى انتظار مهمة اخرى للانتهاء بل يقوم بالانتقال لمعالجة طلب اخر وايضا توجد العديد من المكتبات التى تحتاجها وسوف تجدها متاحه وايضا لديه مجتمع كبير من المطورين.
-
السلام عكليكم ، هل حقا إطار العمل django أوقوى و أفضل من express js/node js
- 2 اجابة
-
- 2
-
-
عندي استفسار عندي مادة ذكاء اصطناعي ودخلت بحسوب بدورة ولافهمت شي كبداية كيف ادخل المجال وافهم اساسيات الدكاء عبارة عن ماذا ماعندي اي فكرة عنه اتمنى اجد رد مفيد يساعدني للجامعه ودراستي وبدورة حسوب
- 1 جواب
-
- 1
-
-
 السلام عليكم ورحمة الله وبركاته ، اهلاً بمجتمع حسوب النزيه 🌹 ، انا لدي استفسار ، اولاً انا متخرج من الكلية التقنية دبلوم فني برمجة مدة سنتين ونص وبعدها اخذت دورة تطوير واجهات المستخدم من اكاديمية حسوب وقطعت شوط كبير فيها ولم اكملها الى النهايه بحكم اني موظف واخذت دورة تطوير التطبيقات بأستخدام جافا سكربت وتعلمت : node js ، react ، Express ، React Native ، typeScript ، Next js انا لم استطع اكمال الدورتين التي اخذتها من اكاديمية حسوب لأنشغالي بوظيفتي ولكن قطعت شوط كبير فيها واصبح لدي الخبرة انا لدي ثلاث اشخاص كل شخص طلب مني انشاء موقع خاص له بأستخدام ، ( mongoDB , Next js , node Js , Express ) ، وذهبت لشركة هوستنجر واكتشفت اني لازم اشتري ثلاث خطط VPS لكل موقع خطة وهذا الشي مكلف ، الان السؤال هنا : كيف هي الطريقة التي ابدأ ببيع مواقع انا برمجتها وهي جاهزه ؟ كيف انشئ استضافة تكون خاصة بالعميل ؟ ( لا استخدم ايميلي الخاص ، ولا استخدم الـفيزا الخاصه بي للدفع للموقع ) هل يوجد كورس ادارة خوادم ؟ كـ فكرة وكـ خطة كيف ابدأ بالبزنس في هذا المجال ؟ ما هي الحلول في مجال الـ DevOps لخدمة مبرمج ؟ الله يعطيكم العافيه ، يبقى مجتمع حسوب نزيه واستفيد منه الكثير شكراً❤️.
 - البارحة
-
مرحبا , ليس من الجيد بشكل عام تخزين الصور في قاعدة البيانات في شكل buffer و ذلك لأسباب تتعلق بالperformance و الScalability, ولكن بشكل عام فإذا كنت تستعمل node js فيمكنك فقط تخزين اسم التعريف لكل صورة مثلا تخزن اسم الصورة أنها image_1.png و عند الإستدعاء في الreact يقوم بوضع الurl الخاص بالbackend قبل التعريف مثلا : https://example.com/uploads/image_1.png ________ في حال ما إذا كنت تستعمل next js فأمر تخزين الصور يصبح أكثر تعقيدا خاصة في مراحل الproductions و في تلك الحالة يستحسن إستعمال aws مثال : للتخزين : const s3 = new S3Client({ region: "me-south-1", credentials: { accessKeyId: process.env.AWS_ACCESS_KEY_ID as string, secretAccessKey: process.env.AWS_SECRET_ACCESS_KEY as string, }, }); //___________________________ import { PutObjectCommand } from "@aws-sdk/client-s3"; import generateUniqueId from "../date_id"; export default async function handleUploadFilesS3({ buffer, filename, }: { buffer: any; filename: string; }) { try { let newFileName = `${generateUniqueId()}_${filename.replaceAll( " ", "_" )}`; let command = new PutObjectCommand({ Bucket: process.env.AWS_S3_BUCKET_NAME as string, Key: newFileName, Body: buffer, }); await s3.send(command); return { name: newFileName, ok: true }; } catch (error) { console.log(error); return { error: error, ok: false }; } } للإسترجاع : const games = await prisma.game.findMany(); games.forEach(async (game) => { try { let command = new GetObjectCommand({ Bucket: process.env.AWS_S3_BUCKET_NAME, Key: game.gameImg as string, }); const url = await getSignedUrl(s3, command, { expiresIn: 3600 * 24 }); game.gameImg = url; } catch (err) { console.log(err); } }); ______ كمان يمكنك إستعمال طريقة الaws في المشاريع الخاصة بالnodejs أيضا .
-
 مرحبا عند رفع الصور يتم استعمال الكود التالي : const s3 = new S3Client({ region: "me-south-1", credentials: { accessKeyId: process.env.AWS_ACCESS_KEY_ID as string, secretAccessKey: process.env.AWS_SECRET_ACCESS_KEY as string, }, }); //___________________________ import { PutObjectCommand } from "@aws-sdk/client-s3"; import generateUniqueId from "../date_id"; export default async function handleUploadFilesS3({ buffer, filename, }: { buffer: any; filename: string; }) { try { let newFileName = `${generateUniqueId()}_${filename.replaceAll( " ", "_" )}`; let command = new PutObjectCommand({ Bucket: process.env.AWS_S3_BUCKET_NAME as string, Key: newFileName, Body: buffer, }); await s3.send(command); return { name: newFileName, ok: true }; } catch (error) { console.log(error); return { error: error, ok: false }; } } handleUploadFilesS3 هي دالة تأخذ بعض الarguments الخاصة بال file مثل الbuffer الخاص به و اسم الfile و تقوم بعمل id مميز له ثم رفعة _______________________________ لإسترجاع url لكل image (signed url) و هو يكون url مؤقت و ليس دائم و يمكنك التحكم في مدتة يتم تخزين في الداتابيز اسم الصورة فقط و ليس الurl لان الurl يكون مؤقت و يتم استعمال اسم الصورة لإنشاء الsigned url كالتالي : const games = await prisma.game.findMany(); games.forEach(async (game) => { try { let command = new GetObjectCommand({ Bucket: process.env.AWS_S3_BUCKET_NAME, Key: game.gameImg as string, }); const url = await getSignedUrl(s3, command, { expiresIn: 3600 * 24 }); game.gameImg = url; } catch (err) { console.log(err); } });
 -
لا بأس يمكنك البدا فى اى وقت شئت ولكن يجب عليك الالتزام بمتابعة الدروس وتطبيق كل ما يتم تعلمه فى الدروس بنفسك حتى تحصل على اقصى استفادة من الدورة . المهم لك اولا هو في البداية بمذاكرة الأساسيات واللغات البرمجية التي تستخدم في تصميم وتطوير واجهات المستخدم . وبعد ذلك قم بمتابعة الدروس العملية حيث فى هذه الدروس ستقوم بالتطبيق العملى على كل ما تعلمته فى الوحدات السابقة . ويجب عليك تخصيص وقت محدد يوميا لمتابعة الدروس حتى لا تمل او تتكاسل فترى ان الوقت قد فاتك وكان من الممكن ان تفعل الكثير حينها . ولا تقلق اذا ما واجهتك اى مشكلة او احتجت اى سؤال فيمكنك السؤال اسفل كل درس فى قسم التعليقات وستجد المدربون متاحين فى جميع الاوقات ومتوفرين لمساعدتك. وهذه بعض الإجابات لطلاب اخرين ستجدها مفيدة لك.
- 1 جواب
-
- 1
-
-
لقد قمت بالتسجيل في هذه الدورة منذ سنتين، وحصلت لي الكثير من الظروف التي جعلتني أبدأ الدراسة للتو، خطة الدراسة ليست واضحة بالنسبة لي.. كيف أتواصل بشكل تفاعلي مع مقدم الدورة ومع الطلاب، وكيف أقوم بالمشاريع العملية فورًا أولًا بأول؟
- 1 جواب
-
- 1
-
-
ماهي طريقة برمجة نظام إدارة القوالب و الستايلات ب xml
-
 مرحبا حسام، ستجد أسفل الفيديو الخاص بالدورة مكان مخصص بالتعليقاتن هناك، أرجوا وضع سؤالك أسفل فيديو الدورة.
 -
https://scratch.mit.Untitled-8 copy copy.sb3edu/projects/1011389316/editor/ حاولت حل مشاكل برمجية في نسختي الخاصة وفشلت 😥 أرجو المساعدة 👆 المشاكل هيا : 1- عدم إختفاء نماذج الأرواح داخل اللعبة (والمتواجدة في زوايا خريطة اللعبة). 2- خروج الدبابة من ساحة اللعب عند ملامستها لحدود الخريطة.
- 1 جواب
-
- 1
-
-
Task A class Player is a class that holds the info of a football player including the following private member variables: 1- Name (string) 2- Year of Birth (int) 3- Height (int) 4- International Goals (int) 5- Nationality Add appropriate setters and getters for the class. The class NationalTeam is a class holding the players in a national football team of a certain country. The class has an array of Player objects [players] of size 18, holding all the players including substitutes (fixed size). The class has another array of Booleans [active] of size 18, where an element at index i in the active array is true if there’s a player in the players array at index i, and false otherwise. Both arrays are private members of the class. Other members of the class include country. The array of players is initially empty, and the active array’s elements are set to false. We can add to the array using the addPlayer(const Player&) member function, which will add the parameter player object in the first empty slot in the players array. The function will also update the active array to indicate that a player is added at that index. The function returns true if the player was added, false otherwise. We can also remove players using removePlayer(string) from the players array by giving the player’s name and the player will be removed (the player object will not actually be removed but, the active array will be updated to indicate this). Make sure that the name entered is not case sensitive. The function will return true if the player was found and removed, false otherwise. There other public member functions in the class including: - getNumOfPlayers // to return total number of players in the team - AvgHeight() // to return the average height of the team players - OldestPlayer() // to return the oldest player object - YoungestPlayer() // to return the youngest player object - AvgIntGoals() // to return the average number of international goals per player in the team - highestIntGoals() // to return the player with the highest number of international goals - operator<< // to output a team’s country and its players info. - writeStatistics(oftream&) // writes team statistics to a file including: o Team Country o Number of players o Average height of players o Name and age of oldest player o Name and age of youngest player o Average number of international goals of players o Name of the player with the highest international goals and the number of goals scored by this player. — For example: Country: # of Players: Avg. Height: Oldest Player: Age: Youngest Player: Age: Avg. Int. Goals: Player with highest goals: Gools: Create a global function readPlayersFromFile(ifstream&) which reads all players info from a file named “players.txt” into an array of player objects. Note that this file will have all of the players of all the teams that will be added later. The file will have the number of players in the file at the first line of the file. An example file is shown —For exampl : 100 Mohamed Salah 1992 173 48 Egyptian //////same for the rest of players until player 100///// Finally, create a main that will: 1- read players from players.txt into an array of player objects. 2- Ask the user to enter a number of national teams where the user will just enter their country names. 3- Next Display the players read from the file and the national teams entered by the user. 4- Now in a loop: Ask the user to add/remove players to teams as many times as they wish You can display players and teams numbered in step 3 such that the user can choose to add a player to a team by their displayed numbers. To remove a player the user has to enter their name to be removed. 5- After finishing step 4, show all of the national teams added by the user including the country and the players in this team using the operator<<. 6- Finally write the statistics of each of the teams to the file statistics.txt. All teams statistics should be in this single file. Writing Good Quality Code No program stays the same. It will need to change to fix bugs, add new features, etc. So, it is very important to write high quality readable code, so that you or other developers can be able to review and modify this code in the future. In this task, you will: 1. Add a comment/header at the beginning of your program saying who the author is, the purpose of the program, etc. 2. Add a comment/header for every function explaining what it does, what parameters it takes and what value it returns. 3. Add comments to any part that is difficult to understand.
-
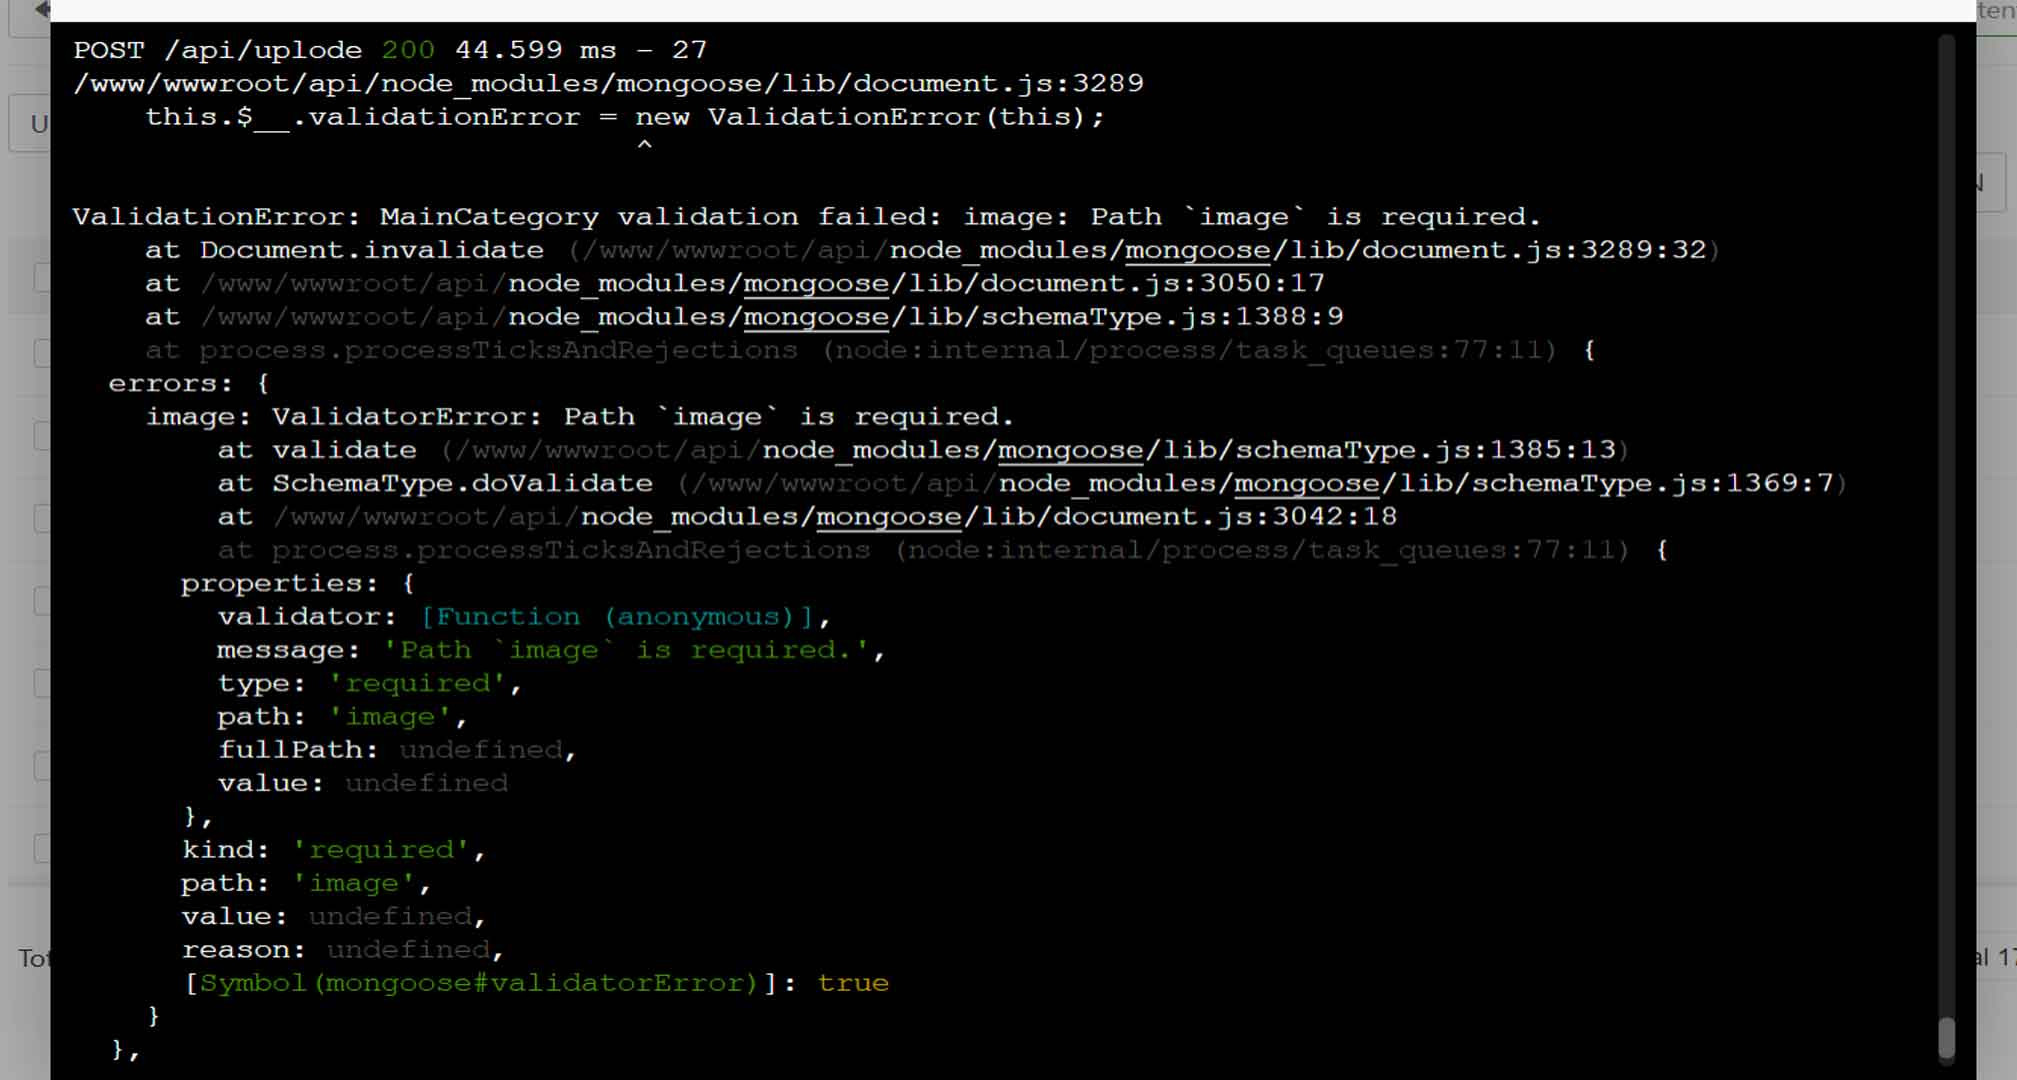
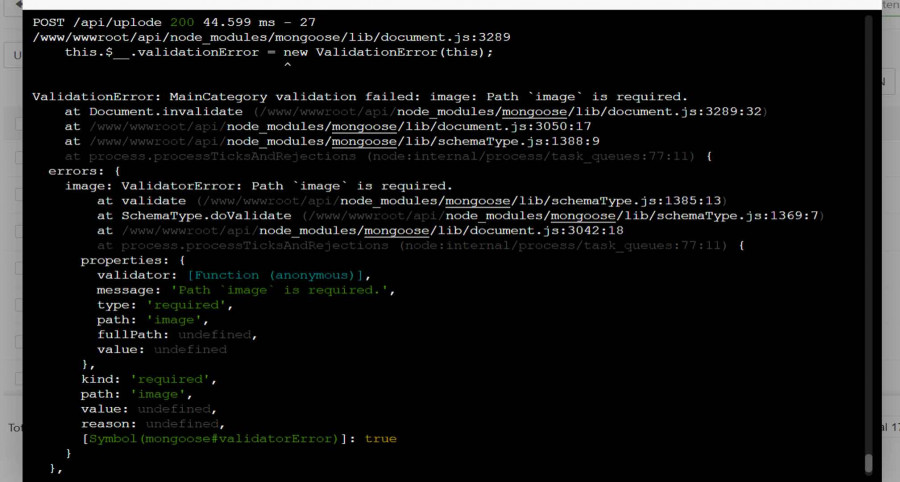
ظهر هذا الخطا
-
قم باستبدال الدالتين handleSubmit و handleImageChange ولا اعرف لماذا تقوم برفع الصورة مرتين حاول فقط رفعها مرة واحده باستخدام api واحد فقط const handleImageChange = (e) => { const file = e.target.files[0]; setimage(file); }; const handleSubmit = async (e) => { e.preventDefault() try { const formData = new FormData(); formData.append('name',name); formData.append('pathname',pathname); formData.append('image',image); await axios.post('https://api.wesamelnagah.com/api/maincategory', formData,{ headers: { "Content-Type": "multipart/form-data", }, }) await axios.post('https://api.wesamelnagah.com/api/uplode',formData, { headers: { "Content-Type": "multipart/form-data", }, }) setname('') setimage(null) setpath('') } catch (error) { console.log(error) } } والان من المفترض ان يتم حفظ الصورة على الخادم وفى قاعدة البيانات بشكل صحيح
- 12 اجابة
-
- 1
-
-
اولا الصورة لا تظهر في مسار ثانيا :بيانات الصورة في مونجو تظهر هكذا { "_id": { "$oid": "663130bf7ae7f1e84fa6e37e" }, "name": "سيبلسيبل", "pathname": "بليسبليبل", "title": "سيبلسيبل", "desc": [ "" ], "image": "[object FormData]", "createdAt": { "$date": "2024-04-30T17:56:15.554Z" }, "updatedAt": { "$date": "2024-04-30T17:56:15.554Z" }, "__v": 0 }
- 12 اجابة
-
- 1
-
-
الخطأ هنا لديك فى كود الواجهة الامامية . قم باسبتدال الكود السابق بهذا الكود . const formData = new FormData(); formData.append('name',name); formData.append('pathname',pathname); formData.append('image',image); await axios.post('https://api.wesamelnagah.com/api/maincategory', formData,{ headers: { "Content-Type": "multipart/form-data", }, }) وتاكد من انه يتم رفع الصورة بشكل صحيح ثم اعد كتابة السطر الذى حذفته فى الخادم
-
هذا كود العميل الذي يقوم بارسال البيانات الى الخادم import React, { useEffect, useState } from 'react' import { AppFooter, AppHeader, AppSidebar, DocsExample } from '../../../components' import axios from 'axios' import { CButton, CForm, CFormInput, CFormLabel, CFormTextarea } from '@coreui/react' export default function programs() { const [name, setname] = useState('') const [image, setimage] = useState(null) const [pathname, setpath] = useState('') const [title, settitle] = useState() const handleImageChange = (e) => { const file = e.target.files[0]; const formData = new FormData(); formData.append("image", file); setimage(formData); }; const config = { headers: { "Content-Type": "multipart/form-data", }, }; const handleSubmit = async (e) => { e.preventDefault() try { await axios.post('https://api.wesamelnagah.com/api/maincategory', { name, pathname, image, // title }, config ) await axios.post('https://api.wesamelnagah.com/api/uplode',image, { headers: { "Content-Type": "multipart/form-data", }, }) setname('') setimage(null) setpath('') } catch (error) { console.log(error) } } return ( <div className="programs_container"> <AppSidebar /> <div className="wrapper d-flex flex-column min-vh-100"> <AppHeader /> <div className="body flex-grow-1"> <CForm onSubmit={handleSubmit}> <div className="mb-3"> <CFormLabel htmlFor="exampleFormControlInput1"> عنوان الباقة</CFormLabel> <CFormInput type="text" id="exampleFormControlInput1" onChange={(e) => setname(e.target.value)} /> <CFormLabel htmlFor="exampleFormControlInput1"> مسار الباقة</CFormLabel> <CFormInput type="text" id="exampleFormControlInput1" onChange={(e) => setpath(e.target.value)} /> </div> <div className="mb-3"> <CFormLabel htmlFor="formFile">صورة الباقة</CFormLabel> <CFormInput type="file" id="formFile" onChange={handleImageChange} /> </div> <div className="d-grid gap-2 col-6 mx-auto"> <CButton color="primary" type="submit"> Submit </CButton> </div> </CForm> </div> <AppFooter /> </div> </div> ) } الصورة التي ترسل الى uplode تصل الى المسار الخاص بها اما التي ترسل الى /maincategory لا يصل الى public/images/
- 12 اجابة
-
- 1
-
-
قم بارجاع السطر السابق كما كان سابقا هكذا. const programmes = MainCategory({name,pathname,title, image, desc}); وقم بمحاولة رفع الصورة واخبرنى هل يتم رفعها الى الخادم ام لا فى مسار public/images/ فاذا لم يتم رفعها الى الخادم فيبدو انه توجد مشكلة لديك فى الخادم .
- 12 اجابة
-
- 1
-
-
في الخطا الاول كان هذا هو المكتوب وايضا نتج الخطا والصورة لا ترسل الى الخادم ويتوقف الخادم عن العمل